Showing posts with label PuppetsWar. Show all posts

Thursday, 3 March 2022

Necromunda Ash Wastes inter-spire light haulage rig and escort runner


In anticipation of the release of the new Necromunda Ash Wastes vehicular combat game, I've dug out a handful of unfinished models and given them a coat of paint.

At the time of writing there's some speculation about the forthcoming game, but not many hard facts. As far as I can tell it looks set to introduce something like the Road Warrior aesthetic of the Mad Max films into the Warhammer 40,000 universe. And not for the first time either. Games Workshop has gone down this route before. Previous instances of the company riffing on George Miller's post-apocalyptic Australian action film series have produced the games Dark Future, Gorkamorka and Speed Freeks.

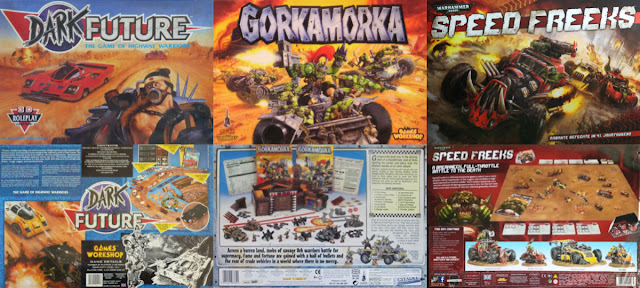
These three games all have various crossover points with what I imagine the new Necromunda expansion to be, but Dark Future, released in the late 80s, was the only one that focussed on human gangs – even if the models were in a slightly different scale to everything else. Coming in at roughly 20mm tall, the miniatures were way bigger than 6mm Epic scale, yet smaller than the 28-32mm of most of GW's other games.* But that didn't stop them being brilliant. Here are a few pages from White Dwarf around the time.

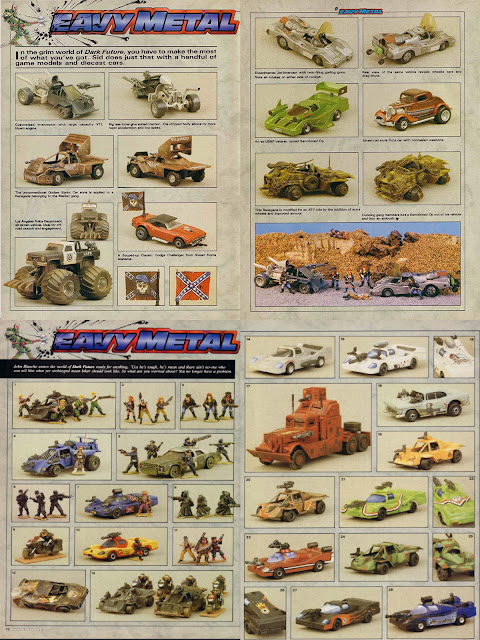
The game bonded a kind of sports car, go-faster aesthetic with the darker Mad Max look and feel, and the results ended up being occasionally grimdark, and occasionally colourful, and occasionally somehow both.

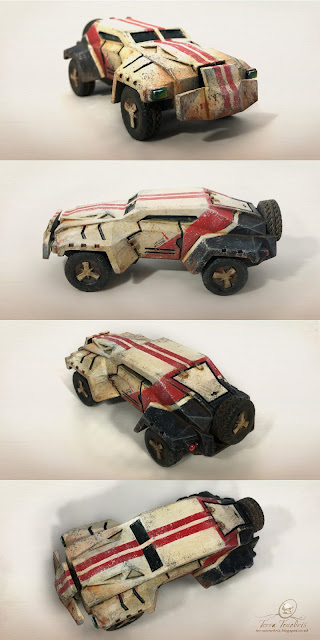
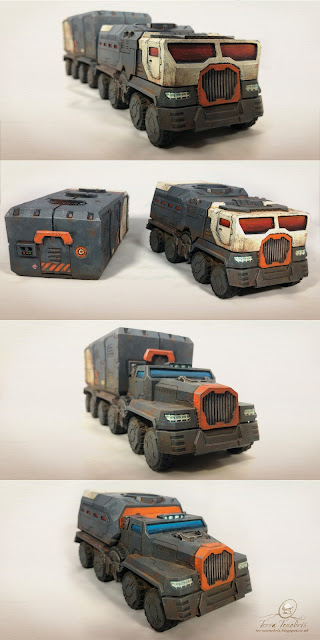
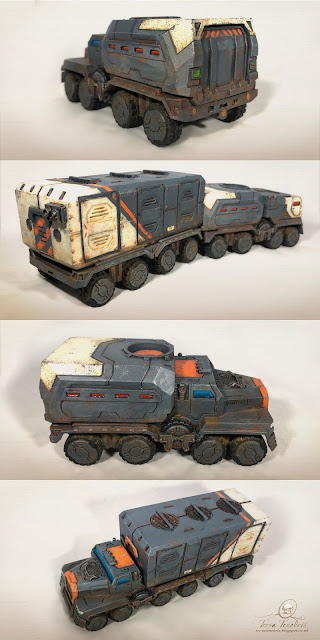
This started me thinking about what I call the Star Wars paint-job. It's the colour schemes we find throughout the Star Wars franchise, where vehicles are painted in predominantly flat, neutral colour tones: greys, creams etc, with a single, brighter, accent colour injected for detailing. And then the whole thing is beaten up, battered, and generally made to look as if it's seen better days. Luke's X-Wing in the original movie is a classic example, and it felt like an interesting direction in which to take a couple of ground vehicles.

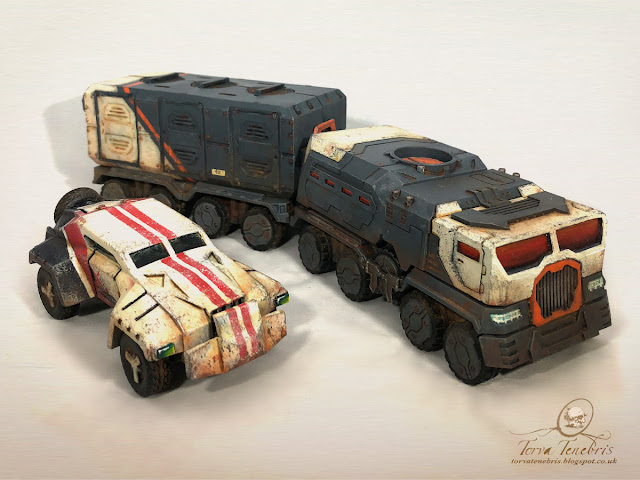
The car below is a Marrua Gaucho from Antenociti's Workshop. It's a solid chunk of resin, and I've talked about the pre-paint clean-up here. I've decided this is going to be an escort runner; a fast set of wheels used to accompany a slower moving vehicle, providing extra tactical options, and additional manpower.


Meanwhile, I've called the truck an inter-spire light haulage rig – mainly because I'm anticipating the land train in the forthcoming Ash Wastes boxset to do a similar job, but to be significantly heavier. The model is actually a Pegasus Tactical Vehicle from Puppets War. You used to be able to buy the trailer (seen in the top image of the below set) that afforded a few different ways to construct the whole thing. I wanted to keep this modular capability as open as possible, so I talked about magnetising the various parts in an earlier post, here.

Below are some of the various different possibilities from the kit, seen from a few different angles. It was important to me that the two alternate cabs had individual paint schemes, but that the rest of the parts would be completely compatible with both.


And last, and probably least, I also quickly painted up the following little fella. It was kind of a test model for the other two, where I could brush up on the techniques and see what worked. The model itself was just a cheap toy car that I found in a pound shop a few years ago, and thought might be good for just this purpose. I don't love the paint job or the vehicle, but it's good enough to pass as a bit of background texture, tucked away in a dark corner, out of full sight.


So now all that remains is to await the new game and see if these models fit with its as yet unseen contents. That and paint the other 6 or 7 hundred other miniatures I've already got kicking around at home.


*And, of course, a lot smaller than the 54mm of Inquisitor

Thursday, 20 June 2019

What's on the desk, then?

In the absence of any real progress on either my small squad of Judge Enforcers or my little cluster of Undead, I thought it would be a good idea to share a few photos of some of the other projects currently cluttering up my desk. Not just to keep this blog up to date, but also for my own mental well-being – a visual list of the outstanding things on my plate, that I've mentioned here before, but still haven't finished. Starting with those aforementioned skellies.


These guys have got a bit of colour on them, and are slowly making their way towards completion, but there's still a way to go.


Scrap-built, modular, industrial terrain (and Games Workshop shipping container) for the city of Kruenta Karoliina Arx Rotunda, or Kru for short. The larger pieces are primed, with the odd spot of colour, but I'm having a bit of a rethink about doing them all grey.


Kit-bashed Sisters of Silence (Or Psilence, as I prefer) and Thunder Warrior. I'm not sure I've ever mentioned the big fella on here before, but he's very much part of my six-strong band of 30K style warriors (my kit-bashed Custodes being the other three).


Mercenaries, henchmen and adventurers. A bunch of converted characters, likely to be found in the city of Kru, undercoated black, with a grey zenithal highlight spray, but otherwise currently going nowhere fast.


Rag-tag Ork vehicles in various stages of completion. It's always a joy to glue random bits of plastic together until you see something you like.


Plague Marines. At some point this little skirmish force will be joining their two Spider-Dreads, but for now they haven't got much further than a base coat in an appropriate shade of green.


And finally here are the civilian vehicles that are siting on my desk. The articulated (and satisfyingly modular) lorry is from Puppets War, and the two cars are from Antenociti's Workshop.


That's it for now. I'm hoping to have some progress on the Judges soon, so I'll hold off showing them here for the time being. Also, there are quite a few as-yet-unseen other projects lying around on my desk, but I'll probably introduce those on a one-by-one basis, as, when and if, they ever show any signs of significant development.


Monday, 27 May 2019

Whether to weather?

If you follow me on Twitter, or you caught my previous post, you may have noticed that I've started dabbling with my Warhammer 40,000 Enforcers again. My Adeptus Arbites sanctioned, Judge Dredd inspired Enforcers who police the mean streets of the hive city, Kruenta Karoliina Arx Rotunda.

I've started painting them, and have found myself tweaking the colour scheme in ways I didn't expect.

In the Judge Dredd comic, along with their red-rimmed helmets and gold shoulder pads, the Judges of Mega-City One sport several green items on their uniform – boots, gloves, knee pads, elbow pads and pouches. In the 2012 Carl Urban film they clearly felt this approach wasn't going to be gritty enough, so although they kept some of the green details, the colour was made so much darker that it was hardly noticeable in the final grade of the movie.

When I started on my troopers, I wanted them to look like the darker, almost entirely black-uniformed movie version, but decided to switch out the dark green altogether in favour of a dark tan leather colour that would probably make for a more easily identifiable texture in miniature form.


And with that I eventually got to the above stage where the test model is just about complete.

Or is he?

Originally, several years ago, when I first envisioned this project, my plan was to make my Enforcers look more worn. A little beaten up. Dusty, battered and generally in-use.


Like these guys

But now I've got this far, I'm not sure the model will really benefit from a lot of weathering. The dust might blur the already difficult to detect line between the harder body armour and the slightly softer black leather jacket and trousers. So I'm faced with a bit of a dilemma. Do I push ahead, sticking to the original plan, and run the risk of making an irreversible mistake, or just stick with what I've got, and let the weathering go the way of the green boots?

The answer is I'm just not sure yet.

ADDICTION CHALLENGE
REMAINING: 44 or 45?


Friday, 10 May 2019

Wheels of judgement

One hundred years ago, I pledged, on this blog, to build a couple of unique models. Ones that would combine a character from a film, with a vehicle from a comic, and infuse them both with a hint of WH40K flavour.

But only a mere few days into the project, I got to a stage that had me stumped. I put the fledgling models to one side, promising myself that I'd return to them soon, once I'd mulled over how to go about finishing them.


Fast forward those hundred years, and I was finally struck by the urge to complete them. In reality I was less driven by the desire to finish them that I was by the guilt of having abandoned them.


And today I think I'm finally at a place where I can share them.


Perps, jimps, futsies and stookie runners*, may I present to you the LexDominum urban patrol bike.


Although they don't look all that complicated, these bikes were a real headache to construct. I worked on them, on and off, for about two and half years, doing tiny, incremental stages every few weeks, then abandoning them for months on end. But I took a few photos along the way, so I can share some of the major leaps forward. 

Before I do that, I'll just share a quick reminder of my original brief. You can see it in full here, but quite simply it was as follows.


Start with this bike as the major ingredient...

... but add the lights from this design...

... to create something a little like this...

... then sprinkle in a hint of the armoured feel of these bikes...

... but base the whole thing on this model

This meant I was starting with two of the Space Marine Scout Bikes, which I cut at the join between the front forks and the main body of the bike.


I started by rearranging the angle and length of the front forks, using plasticard and putty...

... before smoothing off the putty and adding more plasticard to create the basic shape of the front fairing

I then added some simple detail to the reverse of the front section

The guns, rims, rivets, baggage and lights, came next, while I also brought the rider in line with the earlier troops

I bought the lights from Zinge Industries, who have an incredible range of tiny detailed parts for exactly this kind of conversion work (I think it was these ones). However, even though they seem to come in sets of five, and from looking at the photo below I clearly had at least six, I somehow didn't end up with enough to complete the job. So rather than risk interrupting my flow while I waited for a new order to arrive, I decided to cast the missing two with Instant Mold and green stuff. (I talked a bit more about that process when I created the Judges' shoulderpads here.)

Next up: repeat the previous stage on the other bike, but go for a different overall pose

Add the basic shape of a badge in plasticard


Then cut some details from Forge World brass etched eagles...

... to be glued to the front of the badge

Sculpt in the hint of some wings on the eagle badge

Then add final detail to the reverse of the bike

These two bikes finally complete the construction of my entire Judicial Enforcer Squad, a process I started back in the first post of this blog, nearly four years ago. That's slow, but its not my slowest project ever. Not by a long shot**. 

Besides, the real challenge is to see if I can get them painted a little bit quicker. So here's to hoping I can finish them before April 2023.


*For more information see over 40 years of Judge Dredd comics.
**Remind me to tell you about my converted Scout Titan at some point.

Tuesday, 30 May 2017

Aedes servoloader

I think there's a sweet spot that's worth aiming for when chopping up models to kit-bash. It's where the original set provides enough interesting parts to form the basis of two or more new models. It's like maximising the return on investment, where the investment is tiny bits of plastic, and the return is nerd-fuelled, children's toys.

In an earlier post (about making urban scatter terrain), I mentioned I had removed a few extraneous parts from some cheap toy cars I was turning into abandoned wrecks. One of those parts was easily interesting enough to help me reach that aforementioned sweet spot. If you've just clicked on the link it was the bright red crane section on the back of the black, police tow truck. It looked like a fairly decent component on which to base a more sci-fi-esque model crane, but add in the Turret Platform and one of the turret kits from Puppets War and the model practically built itself.

In what is fast becoming the norm with all my one-off projects, Games Workshop released their own model crane, last month, just as I was getting started on mine. Normally, seeing them whip out something amazing, just as I'm planning my B-list version, is quite demoralising. But, fortunately, on this occasion it just motivated me to plough on and get the thing finished.


So the Aedes servoloader was born. It's a mobile mini-crane which I've added to the other vehicles and scenery that represent civilian/industrial life in my Imperial Hive City, Kruenta Karoliina Arx Rotunda.


Once it was built I decided to use it to practice both my airbrush and freehand painting skills. These two techniques seem to cause me untold problems, and I'm always a bit nervous about trying them in case they end in abject failure – especially now that I document everything with this blog.

And, although both attempts did indeed end in abject failure, I was at least able to hide most of the airbrushing mistakes by adding plenty of weathering. Alas, my kindergarten freehand was not so fortunate, and there wasn't much I was able to do to make it look any good. I'm referring mainly to the letters MMXV on the jib, although I'm sure the discerning critic will find plenty of other things to dislike.

Could MMXV be some kind of instruction to anyone having to service or operate the thing? Or is it perhaps short for Mechanised Motive eXtraction Vehicles, a competitor to a firm I've mentioned in the past, Kruenta Demolition and Construction

Or is it simply the year, in roman numerals, that my youngest child was carried forth into this world?


Monday, 26 September 2016

Taming the Pegasus

One of my next projects is the Pegasus Tactical Vehicle and trailer from Puppets War. It's a sci-fi truck that offers you a choice of different configurations for the final model. 

I originally started working on this when the parts arrived last year, but only got as far as building the sub-assemblies. (For a rough guide to prepping resin models take a look here.) The reason I didn't get any further was because I liked most of the final versions of the truck and didn't want to commit to a single one. In a situation like this you would usually just magnetise the model, but there's something strange about the kit, that immediately brought my progress to a standstill.

Puppets War models are renowned for having pre-moulded holes to take magnets. But this kit, with all its interchangeable parts, didn't have any. The holes would have to be drilled by hand. And in this case it meant quite a few holes, all drilled into the finely detailed resin kit, with a drill bit nearly big enough to put up shelves.

And not just that, but the individual sub-assemblies are fairly heavy, so multiple magnets would be needed for each piece, and some of the sets of magnets would need to attach to multiple other pieces. Thus their polarity and the question of whether they repel or attract would need to be carefully considered.

So – although it doesn't look like much progress – in terms of blood, sweat, tears, and the sheer amount of mental energy I had to expend, this job felt like hard work. Long, involved, hard work, but fortunately still quite enjoyable. Maybe even more enjoyable than normal, seeing as my tiny, shrivelled brain also got a little exercise.

The first thing to do was source the magnets. Remember, when working with these powerful little blighters, to keep them away from electronic objects like mobile phones and iPads. You don't want to find the cost of the project suddenly sky-rocketing from an impromptu trip to the Apple Store.

I bought my magnets a while ago, so can't remember now, but I think I probably got them from somewhere like Element Games or Etsy or maybe even Puppets War themselves. If you always buy circular magnets with the same diameter this will help you when it comes to the next stage. This is because you will need to find a drill bit exactly the same diameter as the magnet, so:

One size magnet = only one drill bit needed.

You can check your bit is the right size either by comparing its carefully recorded size with the carefully recorded size of the magnet, or, if careful recording isn't your thing, simply let the magnet attach itself to the shaft of the drill bit and see if they look the same.

Okay, so this looks like a picture of a felt tip pen, but look closely and you can see a magnet attached to the shaft of a drill bit

The next thing for me was to find a tool that will hold the drill bit. I was lucky enough to have been given a Dremel a few years back, and even luckier that it was the right size to hold the bit.

Drill bit, Dremel and Pegasus seen here with superglue that's just itching to stick my fingers together

The three basic pieces of the model are the two trailers and the truck – all of which are sub-assemblies. Once these are in place all the other bits attach to them. For full customisation these three basic pieces need to connect to each other in a couple of different configurations. The two trailer pieces are identical, so it would also be helpful if they could both individually attach to the truck – to save you from having to work out which one is which.

This therefore left me with a problem of three-way connectivity – where every north polarity side must face a south polarity side, but all three pieces must be interchangeable with one another.

To remedy this I drilled two off-centre holes into the connecting edges of each of the three basic piecesThe off-centre holes will help solve the polarity problem and also offer up a little extra strength. 

I've put together a diagram to explain what the hell I'm going on about.


It will make more sense when you're actually doing it.

When all six holes were drilled I went about glueing the first magnet in place. But only the first magnet, as the north-south polarity problem starts to intensify right about now.


A drop of superglue in the first hole. But only a drop, and only the first hole

Push the magnet firmly into place with the end of a paintbrush.

Because the wooden paintbrush isn't magnetic

Then let that first magnet dry. A little patience here will save a lot of frustration down the line. Once it's completely stuck fast, you can let another magnet attach to it. Through magnetic attraction, that is. Don't use any glue! This effectivity tells you which way round the second magnet must go. Liberally mark the back of it with paint or ink.

Hence the felt tip pen

The second magnet will then need to be prised away from the first one, being careful not to wipe off all the ink. It can then be placed in the corresponding hole in one of the other two pieces. If you make sure the ink side isn't visible then you know you've put it in the right way round.

Mark up another magnet in the same way and place it in the third sub-assembly. When the two new magnets are dry, use them to work out which way round the other three magnets need to go. Again, this will make more sense once you have the pieces in front of you.

Once the first six magnets are placed, each of the three basic pieces should connect in every configuration 

I then repeated this process, or at least parts of it, for all the other connections. In the photo above you can see I've started to mark the position (and then, d'oh, in some cases, re-mark it slightly to the side) for all the remaining magnets. I tried to use a minimum of two pairs of magnets per piece, figuring that they'll not just hold everything firmly together, but will keep it all level too. 

Getting the holes drilled and cleaned up, working out the polarity and gluing all the magnets in place was quite fiddly and time-consuming, so I'd advise setting aside a few hours if you want to do something similar.

Once all the magnets were safely stuck in, I mixed up some grey stuff to fill any untidy holes that might be visible on the final model. I originally thought I'd skip this stage through careful drilling and gluing, but with something like 22 holes in total, I just couldn't keep it all neat.


While letting the grey stuff dry on all the other pieces, I used a piece of plasticard to cover the bottom of the container, thereby hiding four magnets in one go and giving the model a nice, smooth base. Once everything was dry I smoothed the grey stuff and plasticard with a file and made all my alterations as tidy as possible.

After this there was only one job left to complete the task. The tow hook that connects the container to the truck needs to be easily removable, but there is very little space on the truck to house a magnet. So for this last connection, I drilled out the hook and built a corresponding area on the truck's undercarriage out of grey stuff. From most angles it will remain hidden, so it didn't need to be brilliant work.

And it wasn't

With that dried and filed smooth (ish) I was able to move on to the undercoat stage. The best part of a can of Games Workshop's black primer later and the whole thing looked like this.


And so I was finally able to put the truck together to see some of those different configurations I was so keen on.


All that's left for me now is to work out a colour scheme that keeps everything together, and then try to paint it.


Tuesday, 12 July 2016

Bringing law to the lawless, one swing at a time

If you've been following my 'Dredd' style Abites project, and you've been paying an inordinate amount of attention, plus you've got an excellent memory for obscure details, you may remember there were two remaining footsloggers I was yet to arm up. And when I say 'arm' I don't just mean weapons, but quite literally their upper set of limbs as well. 

I was going to attempt a 'not-so-armless-now' gag, but I think, even by my own low standards, that's scraping the bottom of an already-well-scraped barrel.

A few weeks ago I started work on the two bike cops that will round out this Arbites squad. A few hours later I had switched my efforts to the two guys shown here. Basically once I realised how difficult it was going to be to build the two identical Lawmaster motorcycles, with their distinctive front fairing, lights, badge and weapons, creating the riot shields from scratch, and converting the mauls felt like it could be a comparitively quick win.

It wasn't. 

I'll come back to that. Here's the pic.


Building the mauls was actually a little simpler than I expected. I merely shaved off all the unnecessary bits from the Space Marine Terminator hammers (that I showed at the bottom of this article) and smoothed over any unsightly areas with either liquid poly or green stuff.

It only got complicated when I came to the hands. The Terminator fists looked too big to attach to the Space Marine Scout arms. It made the Judges look like tiny children wearing comedy Hulk gloves. I toyed with the idea of completely cutting them off, but decided I would never get the grip on the replacements to look as convincing. Instead I slowly carved tiny slivers off the existing mitts until I'd made them as small as I could, without them looking silly. Then I pinned them in place with bits of paperclip, and tried to create a perfect seal with more liquid poly.

The shields were more involved. I wanted them to look like slightly modernised versions of the Enforcer shields released by Games Workshop's Specialist Games division, Fanatic, back in the late nineties (or perhaps early noughties). I knew what I had in mind, so started by looking at other manufacturers for proxy models. I can't remember them all now, but some of the contenders were as follows:

Victoria Miniatures Riot Shields
MaxMini Anti-Riot Gear
Anvil Industry Ballistic Shields
Anvil Industry Riot Shield
Zinge Industries Riot Shield

I also looked through the existing Games Workshop and Forge World stuff, plus the Kromlech, Puppets War, Spellcrow, Fox Box, Ramshackle Games, Pig Iron Productions and Scibor ranges, not to mention brief dalliances with the shields from the Mantic Enforcer Defenders and After Glow Shield Warriors.

But it was all to no avail. Most of the shields I found had something about them I liked, but didn't quite fit what I had in mind. In the end I decided it would be easier (and cheaper) to make them from scratch. 

I wanted a slight curve on the shield so I started with a discarded shampoo bottle. (You can see it in the same article I mentioned above.) I cut a section out of the bottle, washed it thoroughly and lightly scored its surface with a scalpel to give the glue something to hold onto.

I then used plasticard, green stuff, some no-longer-available modelling rivets from Antenocitis Workshop and a Forge World etched brass imperial eagle to build all the details. 

During construction I decided they looked a little plain, so borrowed an idea from the Mantic Enforcer Defender shield, to reinforce the vision slit, as it added just enough extra detail to break up all those flat surfaces without deviating from the original design too much.

Anyway, after many evenings of fiddly work, glued fingers, and some far-from-inventive cursing, the two Arbites are finally ready to join their fellows on the parade ground.

So this completes the beat cops, leaving me with only the two bikes to finish. After that I can finally start painting. With a little luck I won't have grown old and developed arthritis by then. Fingers crossed. While I can still cross them.