Showing posts with label Antenociti's Workshop. Show all posts

Sunday, 26 January 2025

Three fast cars

In the classic 60s heist caper, The Italian Job, a British criminal crew put together a collection of vehicles with which to steal a cache of gold and drive it across the Alps. As well as the iconic 3 Mini Coopers, they also get hold of an Aston Martin DB4* and two Jaguar E-Types. These three fast cars, as Michael Caine's Charlie Croker explains, were on standby in case anything goes wrong. They were to be used as emergency escape vehicles, presumably for rapid redeployment of the senior gang members, should things go belly-up.

This idea of having fast back-up vehicles in case of trouble is not entirely dissimilar to something my dad once told me about motorcycling. If you're going to ride around on a bike, at some point you're going to get into trouble. So try to make sure the bike is quick enough to get you out of that trouble, before hospital or the morgue catch up with you. Of course it's not flawless logic, but in my time as a biker it definitely came into play on at least one occasion.**

Civilian motorbikes should play out in a future project, but for now the idea of quick, nimble transport, that isn't military in its design, is going to concern itself with vehicles of the four-wheeled nature. It's something I've wanted to bring to my Warhammer 40,000 tabletop wargaming collection for a while, as it fits well with my interest in the domestic side of life in Games Workshop's far future. Of course, in the game, we rarely get to see this civilian side, and the setting only occasionally reveals the existence of what it refers to as groundcars. There are scattered mentions in some Black Library fiction, but the only official models I can think of that come close to being actual cars are the Achilles Ridgerunner for the Genestealer Cult armies and the Tauros and Tauros Venators from the Enforcer and Astra Militarum ranges. And to be fair even these are substantially more like military buggies than civilian cars.

Achilles Ridgerunner and the old Elysian Drop Trooper Tauros

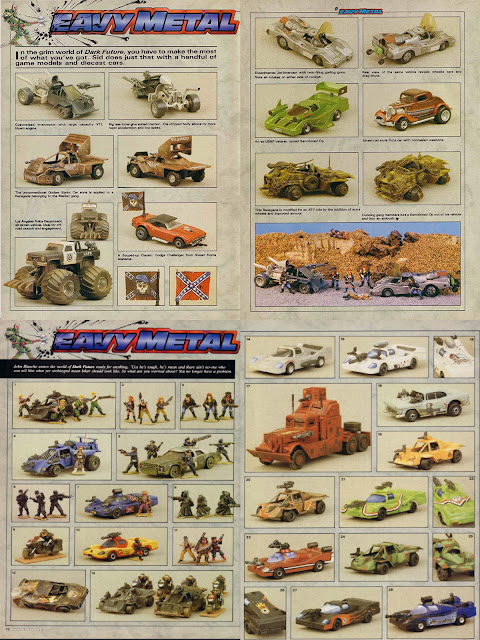
So what might civilian groundcars actually look like? The first time I saw any kind of model to represent this was probably way back in April 1990, in White Dwarf issue 124. In the 'Eavy Metal section we were shown Dale Hurst's scratch-built Genestealer Cult Coven Limousines.

Dale Hurst's seminal Genestealer Cult

This sparked a wave of similar-looking converted vehicles, that used contemporary cars from other toy companies as their basis. Eventually smaller wargaming companies got in on the act, and some truly incredible models were produced. Most notably for me was the line of civilian vehicles made by Grim Skull, for use not just by the aforementioned Genestealer Cultists, but by Inquisitorial warbands as well. At the time of writing, these models can still be purchased over at Wargame Exclusive. I might well take another look myself at some point in the not-too-distant-future.

Gothic sci-fi vehicles from Wargame Exclusive

The models include a wealth of incredible detail, from armour plates, to hood-mounted weaponry, caterpillar tracks, vents, spikes and even wings. But they were not quite what I was after for this project. I wanted something a little less ornate. Something that looked fast and utilitarian.

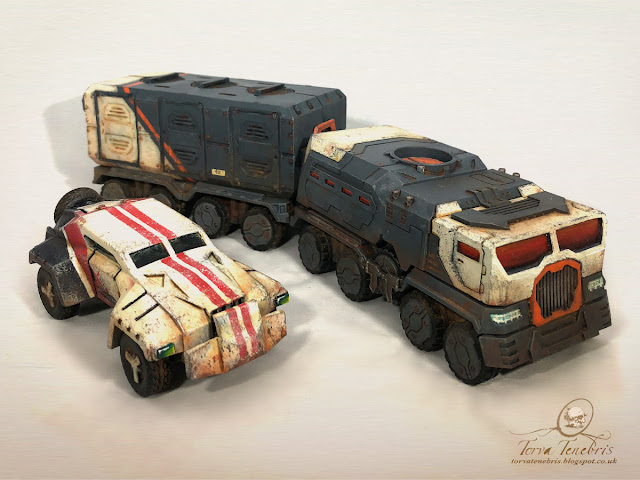
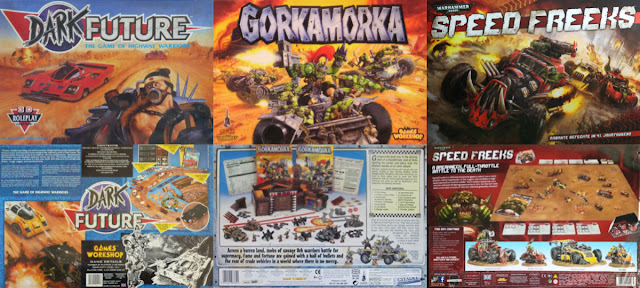
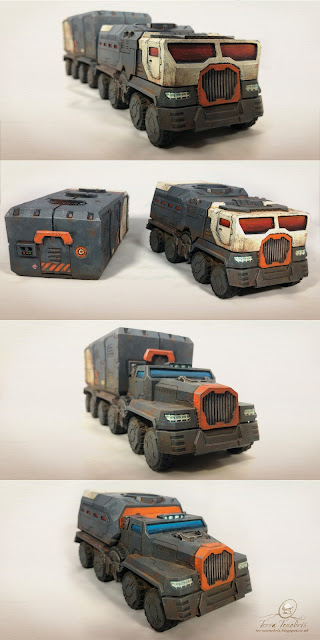
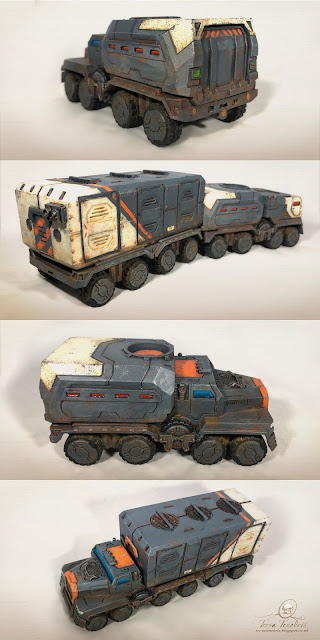
When I first heard Necromunda was taking to the Ash Wastes, I thought it was going to be a vehicular combat game, along the lines of Games Workshop's much earlier Dark Future. I had already made a handful of civilian vehicles (for use as both generic working sci-fi vehicles and as burnt-out terrain), so I was inspired to finish another small batch. But most of these earlier projects were about getting something finished, or exploring a paint scheme, rather than pursuing a specific design idea. So this time I wanted to go a bit further, taking The Italian Job's three fast cars as a starting point, and seeing what they might look like, ripping across the wastelands of the far future.

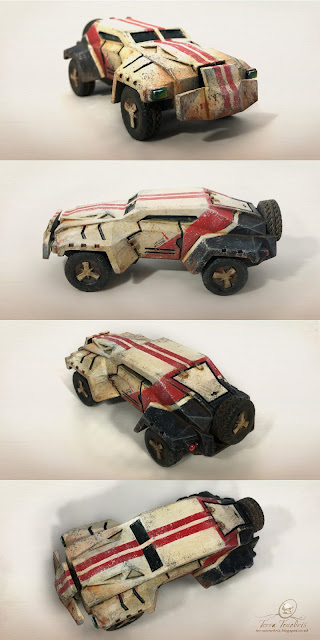
Enter the somewhat niche concept of customised, off-road sports cars. 


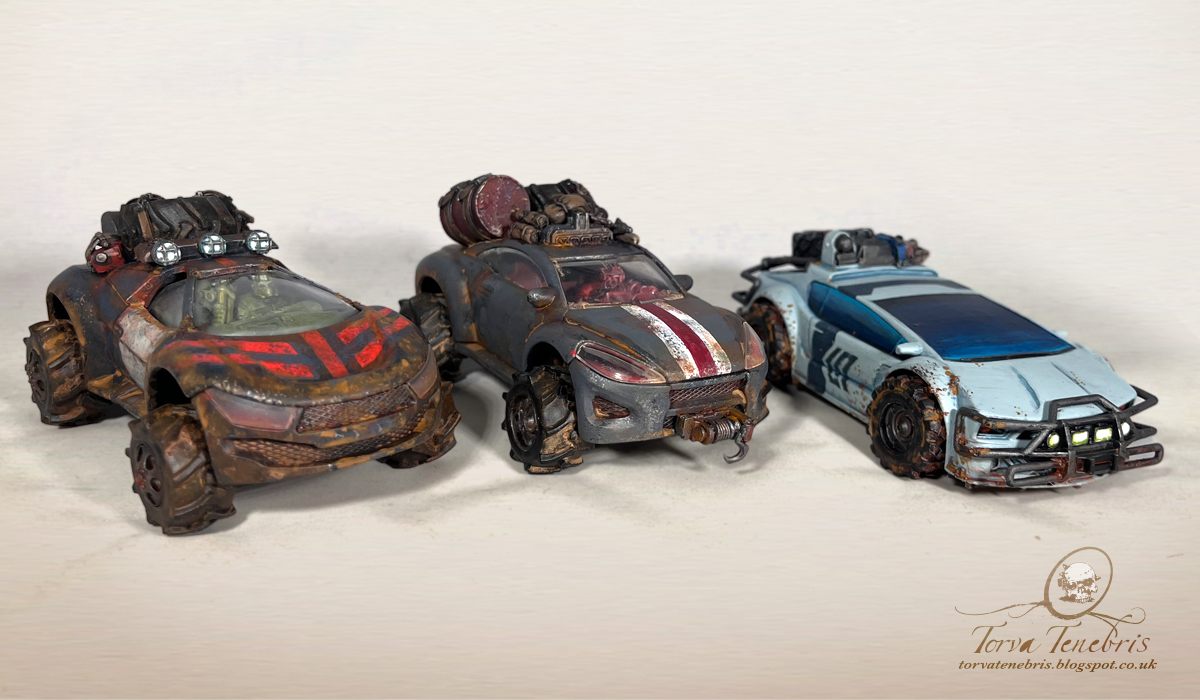
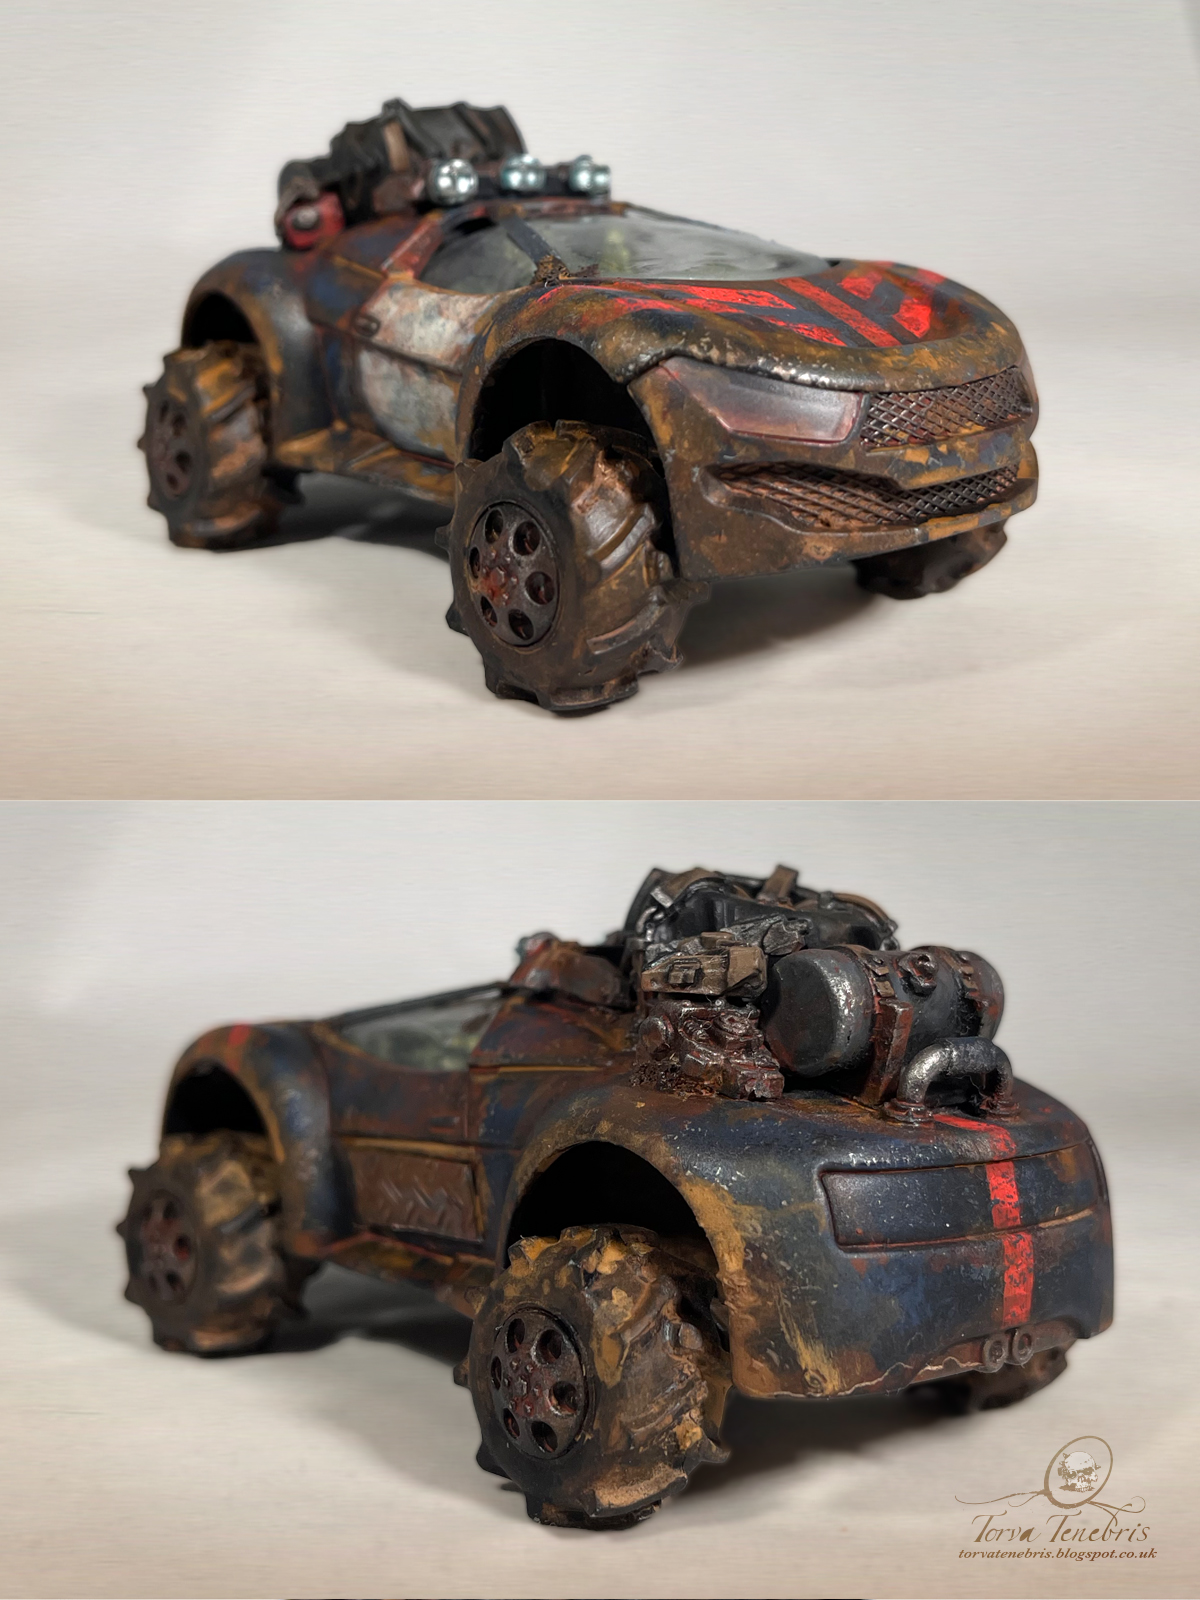
This was pretty much what I was after. But maybe not quite so pristine. So for the general condition of the vehicles I looked to the 2008 movie Death Race (the Jason Statham remake of Death Race 2000). The cars in the movie sported cool-looking guns, which were very tempting to appropriate on my models. But I had promised myself that my three vehicles would remain civilian to look at, being used for the deployment of gunmen, gangers and heavies, rather than carrying obvious mounted weaponry. Thus the cars themselves needed to be unarmed. So from the Death Race aesthetic I just wanted to incorporate some of the scratched and damaged panels, and hastily welded field repairs to give my vehicles a bit of much needed dark future flavour.

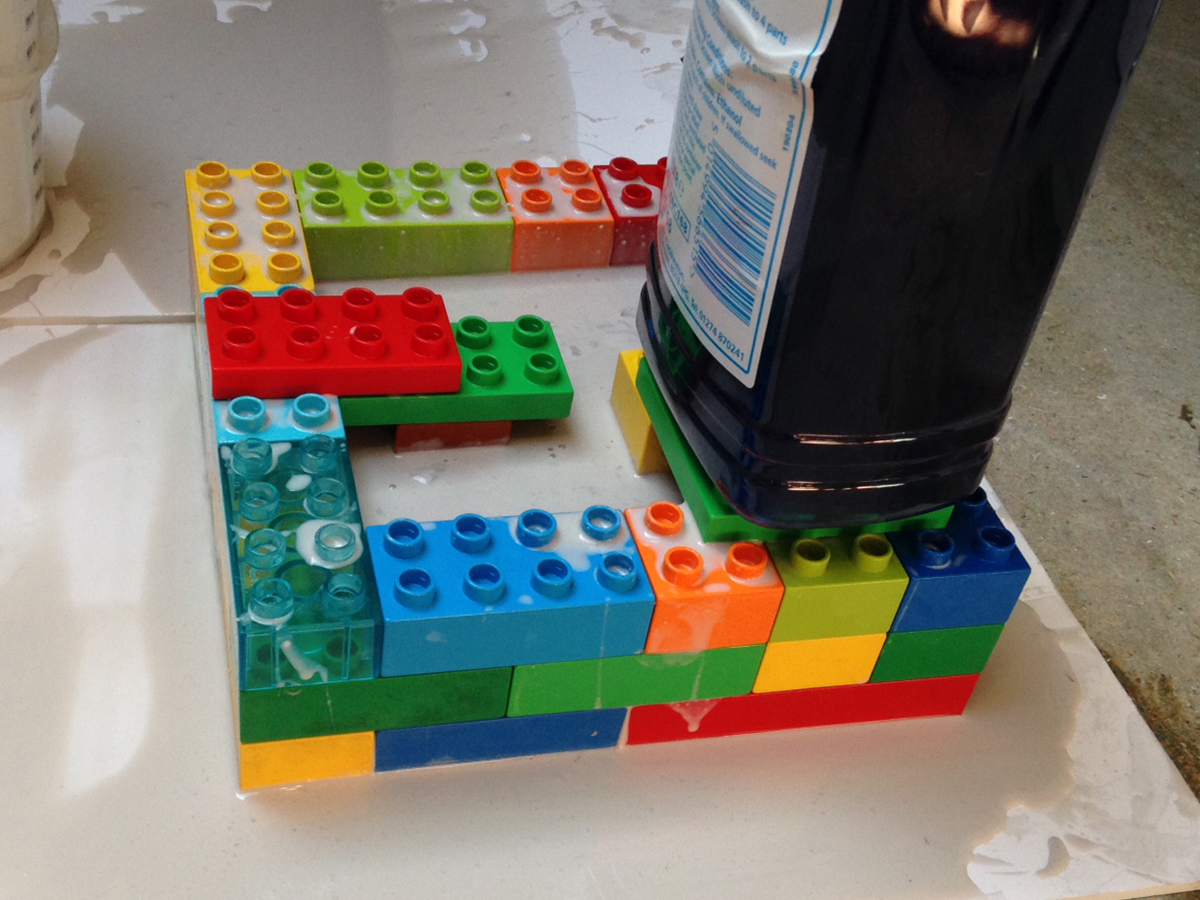
I was lucky enough to already have an unfinished model car in my collection that seemed like it might fit my desired look. It was the Marua Nemesis from the sadly now defunct Antenociti's Workshop. It's the black undercoated model in the below photo, and you can see my initial clean up of it here, from way back in 2016. After some scouting around in my local pound shops I managed to find another couple of fast cars that looked like they might be roughly the same scale. The red one is plastic, whereas the orange one has a metal shell. 


I broke all three models down to their constituent parts, in order to see what could be done without cutting anything up. 


Th
en ordered some additional bits from the ever-reliable Zinge Industries. Mainly wheels and lights.


After this, a quick raid of my bits box, including scouring through any left-over parts from Ramshackle Games, in order to find some extra gubbins to stick on the roof of each model.


And then just one last thing before painting. The two pound shop cars both had see-through windows and interior detail, meaning I was able to create a few armed gangers sitting inside, either driving the cars, or riding shotgun. This really helped, er, 'drive home' the message about ferrying manpower from one place to the next. If you look closely at some of these photos you can just see them through the plastic windows. 


After painting the first two in something approaching the Death Race style, I decided I wanted a lighter, more obviously different colour scheme for the third vehicle. So instead I went for a slightly newer finish, that, although clearly dirty, was only just beginning to take more serious damage. I should probably have used an airbrush to achieve smooth colour transitions between the lighter and darker areas, but to be honest I think I'm still a bit apprehensive of that particular tool. Perhaps more effort with an airbrush can be one of my goals for the year. I guess I can check back in December to see if it has transpired.


In the meantime I foresee quite a few more Orks on the immediate horizon, as I'm hoping to put a significant dent in the remainder of their un-painted army this year. But I'm getting ahead of myself. There'll be more on them and their machinery next time. Until then.


* Apparently the Aston Martin was damaged early on in filming, so a Lancia Flaminia was disguised to look like it for the Mafia hilltop scene where all three cars are pushed off the cliff.
** For the sake of balance, it's also worth noting that the sheer instant power of a sport bike probably got me into trouble as well.

Thursday, 3 March 2022

Necromunda Ash Wastes inter-spire light haulage rig and escort runner


In anticipation of the release of the new Necromunda Ash Wastes vehicular combat game, I've dug out a handful of unfinished models and given them a coat of paint.

At the time of writing there's some speculation about the forthcoming game, but not many hard facts. As far as I can tell it looks set to introduce something like the Road Warrior aesthetic of the Mad Max films into the Warhammer 40,000 universe. And not for the first time either. Games Workshop has gone down this route before. Previous instances of the company riffing on George Miller's post-apocalyptic Australian action film series have produced the games Dark Future, Gorkamorka and Speed Freeks.

These three games all have various crossover points with what I imagine the new Necromunda expansion to be, but Dark Future, released in the late 80s, was the only one that focussed on human gangs – even if the models were in a slightly different scale to everything else. Coming in at roughly 20mm tall, the miniatures were way bigger than 6mm Epic scale, yet smaller than the 28-32mm of most of GW's other games.* But that didn't stop them being brilliant. Here are a few pages from White Dwarf around the time.

The game bonded a kind of sports car, go-faster aesthetic with the darker Mad Max look and feel, and the results ended up being occasionally grimdark, and occasionally colourful, and occasionally somehow both.

This started me thinking about what I call the Star Wars paint-job. It's the colour schemes we find throughout the Star Wars franchise, where vehicles are painted in predominantly flat, neutral colour tones: greys, creams etc, with a single, brighter, accent colour injected for detailing. And then the whole thing is beaten up, battered, and generally made to look as if it's seen better days. Luke's X-Wing in the original movie is a classic example, and it felt like an interesting direction in which to take a couple of ground vehicles.

The car below is a Marrua Gaucho from Antenociti's Workshop. It's a solid chunk of resin, and I've talked about the pre-paint clean-up here. I've decided this is going to be an escort runner; a fast set of wheels used to accompany a slower moving vehicle, providing extra tactical options, and additional manpower.


Meanwhile, I've called the truck an inter-spire light haulage rig – mainly because I'm anticipating the land train in the forthcoming Ash Wastes boxset to do a similar job, but to be significantly heavier. The model is actually a Pegasus Tactical Vehicle from Puppets War. You used to be able to buy the trailer (seen in the top image of the below set) that afforded a few different ways to construct the whole thing. I wanted to keep this modular capability as open as possible, so I talked about magnetising the various parts in an earlier post, here.

Below are some of the various different possibilities from the kit, seen from a few different angles. It was important to me that the two alternate cabs had individual paint schemes, but that the rest of the parts would be completely compatible with both.


And last, and probably least, I also quickly painted up the following little fella. It was kind of a test model for the other two, where I could brush up on the techniques and see what worked. The model itself was just a cheap toy car that I found in a pound shop a few years ago, and thought might be good for just this purpose. I don't love the paint job or the vehicle, but it's good enough to pass as a bit of background texture, tucked away in a dark corner, out of full sight.


So now all that remains is to await the new game and see if these models fit with its as yet unseen contents. That and paint the other 6 or 7 hundred other miniatures I've already got kicking around at home.


*And, of course, a lot smaller than the 54mm of Inquisitor

Thursday, 20 June 2019

What's on the desk, then?

In the absence of any real progress on either my small squad of Judge Enforcers or my little cluster of Undead, I thought it would be a good idea to share a few photos of some of the other projects currently cluttering up my desk. Not just to keep this blog up to date, but also for my own mental well-being – a visual list of the outstanding things on my plate, that I've mentioned here before, but still haven't finished. Starting with those aforementioned skellies.


These guys have got a bit of colour on them, and are slowly making their way towards completion, but there's still a way to go.


Scrap-built, modular, industrial terrain (and Games Workshop shipping container) for the city of Kruenta Karoliina Arx Rotunda, or Kru for short. The larger pieces are primed, with the odd spot of colour, but I'm having a bit of a rethink about doing them all grey.


Kit-bashed Sisters of Silence (Or Psilence, as I prefer) and Thunder Warrior. I'm not sure I've ever mentioned the big fella on here before, but he's very much part of my six-strong band of 30K style warriors (my kit-bashed Custodes being the other three).


Mercenaries, henchmen and adventurers. A bunch of converted characters, likely to be found in the city of Kru, undercoated black, with a grey zenithal highlight spray, but otherwise currently going nowhere fast.


Rag-tag Ork vehicles in various stages of completion. It's always a joy to glue random bits of plastic together until you see something you like.


Plague Marines. At some point this little skirmish force will be joining their two Spider-Dreads, but for now they haven't got much further than a base coat in an appropriate shade of green.


And finally here are the civilian vehicles that are siting on my desk. The articulated (and satisfyingly modular) lorry is from Puppets War, and the two cars are from Antenociti's Workshop.


That's it for now. I'm hoping to have some progress on the Judges soon, so I'll hold off showing them here for the time being. Also, there are quite a few as-yet-unseen other projects lying around on my desk, but I'll probably introduce those on a one-by-one basis, as, when and if, they ever show any signs of significant development.


Monday, 10 October 2016

How not to go about silicone moulding

Today's entry is the first, and hopefully only, in a series of "How Not To..." guides.

It details my not-so-successful attempt to try silicone moulding for the first time.

Yet while I'm hoping to avoid more mistakes of this magnitude, it is undeniably true that I learnt a great deal from the process. So much so that it's worth documenting it here.

But before I get into that, let me ramble on for a moment about what I wanted to achieve and why.

A few weeks ago I finally got around to playing Destiny – Bungie's impressive first-person shooter (that was two years old last month). Within minutes of starting the game I had seen something that inspired* me to start this new project.

It was right at the beginning, where you spawn for the first time outside the old cosmodrome, and was pretty much the first thing you see. Take a look at this screen shot of abandoned cars, slowly rusting into oblivion (after their owners deserted them in hopes of heading off world). I figured a few of these scrapped vehicles would make great scatter terrain for the derelict areas of my city.

At roughly the same time I also happened to be prepping some sci-fi cars that I'd bought from Antenociti's Workshop. I thought they'd look fantastic as dilapidated, rusted, old hulks, but the original models were far too nice to simply ruin like that. Instead I decided I'd try to make a silicone mould of them and cast some replacements out of plaster, which I could then hack away at as much as I liked.

I'd come close to dabbling in silicone moulding before. It was about ten years ago. I'd been thinking of casting up some scratch-built architectural features (gargoyles, doors, pillars etc.) for my Chaos town project.** I'd got as far as buying the liquid rubber, the catalyst and a mixing bucket, but then my interest fizzled out and some other idea grabbed my tiny, erratic mind.

So I still had all the stuff and could remember enough from my earlier research to know that I'd need a load of Lego from which to build the mould's frame. Luck smiled on me again as my kids had a bunch of Duplo bricks that I reckoned I could appropriate for a couple of days without them noticing.

Add in some old chopsticks for mixing, and hey presto, a complete silicone moulding kit

The only problem was a tiny line of type on one of the silicone products that mentioned a six month shelf life.

A six month shelf life starting around the time I bought them, ten years ago.

Should I be worried? Nah, who looks at best before dates? When I see them on food packaging I take them as a guideline at best. Surely they're only there for legal reasons and to hasten repeat purchase? In my book food is ruined when it looks ruined, not when some imaginary date is passed. Besides, the liquid rubber looked fine, and even if it didn't work, what was the worst that could happen?

The worst, you say?

I was about to find out.

I added the liquid rubber into the mixing pot.

When I went to add the catalyst I noticed some of it didn't look right – it had crystallised a bit. But what could I do? Stop now and throw the rubber away? Or embrace the spirit of adventure and see what might happen?

So I built my Lego frame, put it on a large, flat piece of card and carefully placed the vehicles inside.


Then I poured in the thoroughly mixed rubber and catalyst, and went off to make a cup of tea, congratulating myself on how easy the whole process had been.

But by this point I had made two major mistakes.

The first was ignoring the shelf life, but can you see what the second was?

And I don't just mean all the air bubbles in the mixture

Neither the Lego nor the cars were weighed down or secured to the base. When I came back five minutes later there was liquid rubber seeping out all over the place, and the cars were floating in the meagre left-overs within the frame.

I had to think quickly, so I grabbed some spare Duplo bricks and tried to build something that would hold the cars down, and take a heavy bottle to do similar with the frame itself.


This seemed to do the job as the cars remained submerged and the frame appeared to stop leaking. I had lost a fair bit of the rubber fluid, and made quite a mess of my work area, but I figured I'd got it under control.

The instructions on the tin told me that 48 hours would be sufficient for the rubber mould to go completely solid, so I waited 2 days, popping in every now and then to check everything looked okay.

But at the end of that time the liquid rubber had not even got the slightest bit thicker. It was still a consistency somewhere between thick paint and runny yoghurt. The sell-by date was well and truly passed.

I was prepared to chalk it up as a long-shot that hadn't paid off, except there was now an awful lot of liquid rubber covering an awful lot of toys, tools and space. And most of those toys didn't even belong to me (all that Lego belonged to the kids, remember). And to make matters worse, the liquid rubber behaved just like thick, oil-based house paint. It's designed to be peeled off once it goes hard, but it's infinitely more difficult to clean when still a liquid.

In fact it was only when starting the clean-up that I realised it would take hours of careful scrubbing to return everything to its original condition.

To cut a long story short, the process of clean-up took me about six or seven hours, involved soaking everything in buckets of white spirit, used up an entire roll of kitchen paper, necessitated me throwing a lot of stuff away, and left the floor of my work space quite badly stained.

On the plus side however, the kids' Duplo now looks really clean.

And if I ever decided to do this again I'll know the importance of gluing my subject models to the base and weighing the frame down with something very heavy.

But did I want to do this again? The way I saw it I was faced with three possible ways to continue:

1) Scrap the whole project and never mention it again.

2) Start again from scratch, buying fresh silicone rubber materials, and use my new-found experience to get it right.

3) Find a completely different way to achieve the same goal.

After discovering the price of a new silicone moulding kit – something like £30 or £40 – I was pretty convinced number 2 was off the list. And 1 just sounds like defeat, so number 3 it was.

Armed with just £2 in my pocket I headed to the nearest Pound Shop where I was able to buy some toys that might just prove to be perfect for this job. If all goes according to plan it will give me four, lovely wrecked vehicles for my sci-fi city terrain, all in roughly the same scale as the original Antenociti's Workshop kits.

In fact the only downside is my recent track record regarding plans. Specifically with events not going according to them

I'm looking forward to tackling this brand-new project in the near future. I'll document any further failures here. As they say "I've learnt so much from my mistakes, I'm thinking of making a few more".


*I've been inspired by Destiny before. The concept art and screen shots sparked me into making some mercenaries and gunslingers that might be found in the bars and cantinas of Kru. You know the kind of places, wretched hives of scum and villainy. There's clearly something about the aesthetic of Destiny that appeals to my inner model maker.
**Which, despite repeated mentions, I still haven't managed to share on this blog.


Wednesday, 14 September 2016

That new car feeling

I'm currently going through a phase of working on civilian vehicles for my Warhammer 40,000 Imperial Hive City, Kruenta Karoliina Arx Rotunda.

If you read this blog regularly you might be getting a little bored of hearing that opening sentence, so I apologise. I'm not trying to annoy you. Just try to think of my introductory line as the bit you used to find at the beginning of a serialised TV show – back before boxset culture was so firmly established, and we didn't watch entire shows over the course of a marathon binge weekend. You know the part I'm talking about, where pertinent clips from old episodes were played and the narrator said "Previously on 24", or whatever the name of the show was. It's the catch-up that helped you pick up the story after a week's absence.

So, back to the matter in hand, previously on Torva Tenebris, I was talking about looking at cars and stuff.

As part of this I recently bought a couple of small kits from another of my favourite manufacturers, Antenociti's Workshop. It's a website full of great gear, and if you're into this kind of thing, and not yet familiar with them, then put aside an hour or so and go and get lost in their inventory.

The two vehicles I bought were the Nemesis Police Car and the Marrua Gaucho. Here's a shot of all the components, and the condition they turned up in.

Pretty darn good if you ask me

For the rest of this post I'll just quickly cover the few basic steps I went through to prepare the models for painting. I apologise (again) if this is all a little too kindergarten for you.

With resin kits, before you do anything else, you are always advised to give them a good scrub to clean off all the mould release agent.* I left mine in the sink (with water and washing-up liquid) to soak for about an hour first, then went at them with an old toothbrush.

Probably best not to use the brush on your teeth afterwards


After a little more soaking, I rinsed them several times and left them to dry. I then started work on the flash – the little bits of resin that creep through the gaps in the mould and aren't really supposed to be there. For big kits it's worth investing in a big file – this will really speed up the process.

Just to confirm I was not paid by B&Q for the placement of their product


The bodies of the cars hardly needed any work, but the wheels were slightly more involved. And I used a scalpel, rather than a file, to carefully remove any excess from those delicate looking bullbars. Once this was done, I brushed off all the resin powder, and realised it might have made more sense to file first, wash second.

Either way, the models were then ready for some glue. I wanted the wheels to stick out slightly further than my (freshly-filed) wheels were doing, so I stuck a small washer to the back of each wheel, before attaching them to the main bodies.


I didn't glue the bullbars to the Nemesis, as I thought they might interfere with the painting at a later stage, so have only attached them lightly for the benefit of the photo. I'l remove them again before I spray the undercoat.

There was one other stage I went through in prepping these cars. It wasn't relevant to the process, and it didn't work out so well – you might even say it was a complete disaster – so I won't go into it now, but will instead attempt to re-live the whole story in a later post.

It may take me a while to summon the courage.


*Do people wash plastic kits as well? I don't. Perhaps the injection moulding process doesn't require
 release agent? Or maybe I'm doing it all wrong?