Friday, 25 November 2016

An interview with Jake from Ex Profundis

Today we are talking to Jake, aka Bruticus, from the modelling website, Ex Profundis, which hosts collections of miniatures, art and fiction from the darker sides of the Warhammer universes.

Hi Jake, thanks for taking the time to speak with me. Let's dive right in. Do you remember your very first miniature? Do you still have it?

Heroquest and Space Crusade were my introduction to Games Workshop (GW) and the first things I painted were either the Heroquest figures or a friend’s RTB01 Space Marines, back in the early 90s. After that I bought a little of everything, starting with some of the fantastic Kev Adams Night Goblins and Jes Goodwin High Elves – I remember the Silver Helms in particular really got me hooked. After a few happy years of buying all the miniatures, I sold off my collection. And then inevitably about five years ago I proceeded to buy it all back at grossly inflated prices when some friends put together a Necromunda game out of the blue. I tend not to do things by half measures, and so things have since escalated.

Clearly you are hugely inspired by the modelling and painting side of the hobby, and you mentioned Necromunda, but do you play other games too?
I have played Inq28/Inquisimunda a lot in the last few years but nothing much recently. I’m nostalgic for the classic rulesets – the 40K 2nd Edition/Necromunda style, but also Epic and the various Specialist Games – that I used to play as a kid, but I’m also pretty much exhausted by giant rulebooks. I have been working on a few armies for Age of Sigmar that I hope to get some games with soon, plus I have several Epic armies and I’m certainly going to need at least one Blood Bowl team.

What Age of Sigmar armies have caught your attention? And how will you imbue them with the Ex Profundis style?
Pretty much every army has my attention now, with the exception of Fyreslayers. I like Fyreslayers more than traditional dwarves, but it’s like the Emperor’s new clothes: they are still just little hairy dudes, except now they are naked. I think being able to put a new spin on each faction is really cool, and GW has done a good job themselves – with their background for factions like the Flesh Eater Courts really demonstrating how moving from the Old World setting has allowed imagination to run riot. My primary interest is in creating a different take on factions that have potential, but where I have not liked the studio version – usually because it is too brightly coloured and too clean. My Stormcast were my first attempt at providing a darker alternative – Chaos and Aelves are next.

Stormcasts of the Immortal Tribunal and their distinctive porcelain enamelled armour

Is it true the other model makers and artists involved with Ex Profundis are not all friends from back home and that you’ve never physically met some of them?
The site is a joint venture between me and Rob (Meade). We noticed each other’s work on the Dakkadakka forum and decided we shared a similar aesthetic and mindset. Recently we have added new people to the site like Julian Bayliss, who was one of my biggest inspirations when I decided to take up my paintbrushes again, and Isaac (Weirdingway).

The Ex Profundis aesthetic is quite different to most of the standard miniature lines. But it has similarities with John Blanche’s Blanchitsu look. Have you met him?
I’ve been lucky enough to play a few games with John. Some of my earlier models were in Visions. I don’t try to copy John’s Blanchitsu style, but I try to imitate his mindset as far as I am able – most miniature painting is primarily concerned with painting inside the lines and being technically impressive: competition style or ‘Eavy Metal painting. I think Blanchitsu is more about being creative. Personally I also like to try and use a lot of texture, and darker tones.

The hereteks of House Sinekai with their gholams and chimerics

What was it like having your models appear in, arguably, the world’s most famous miniature-based gaming magazine?
I don’t think I have ever been happy with a finished miniature, and seeing them enlarged in photographs highlighted their flaws. It was exciting – and a great honour – but embarrassing. Mostly it motivated me to want to make better models.

I’ve not seen anything for you to be embarrassed about. How did the Ex Profundis look and feel start to develop?
As a kid it seemed to me that considering the 41st Millenium was mostly about war, the models are often pretty cheerful looking. I used to have a Mordian Iron Guard army that I painted to look like Great War trench soldiers - covered in mud and blood: this seemed far more appropriate than the bellhop uniforms they wore on the box. I think I am just doing the same sort of thing now.

The website name comes from the phrase ‘creatio ex profundis’ which means 'creation from the depths' or 'creation out of chaos'. It is intended to be evocative of Lovecraftian gods of the deep and the Chaos gods in the Aether. This sort of horror aesthetic is what I am most interested in communicating in my models – dark and creepy, and suitable denizens of a universe that is pretty keen on war.

Dissimbre, the Immortal Sword, Lord of Slaanesh

Was there an initial project that made you go ‘yeah, that’s the aesthetic I’m after’? Were there failed attempts before that?
My first Pit Slave gang worked out well: they were sort of a cross between Spartacus and Silent Hill. I tried to use more unusual kits as the base, and I tried painting them using more muted tones – oh and I discovered Tamiya Clear Red blood effects. I suppose this is when I started figuring out how to paint in a way I was happy with, rather than trying to emulate ‘Eavy Metal. Shortly after this, John Blanche got in touch to say he liked them, which I think really convinced me I was on the right track!

Models from Jake's second Pit Slave gang

A lot of the Torva Tenebris blog is about finding inspiration to start painting. Where does your inspiration come from?
I get inspired by all sorts of things and then I try to introduce them into the Warhammer setting in a sympathetic way – like Lovecraftian horror for example. I think a lot of hobbyists base their projects entirely on the (excellent) background ideas found in Games Workshop books, but I try to steer clear of that and find ideas elsewhere. I don’t want to do things that other people have already done, particularly if they have done them better than I could! Painting something like an Ultramarine sounds incredibily daunting to me – have you seen some of the Ultramarines out there? I would have nothing interesting to contribute.

Recently – with Age of Sigmar – I have been trying to introduce elements from my favourite fantasy: the manga Berserk, the art of Mike Mignola and some classic Adrian Smith barbarian style. There is a real shortage of dark fantasy fiction out there, but I get inspired by lots of authors from all sorts of genres: Thomas Ligotti, Laird Barron, Steven Erickson… too many to mention. Silent Hill is a constant source of ideas.

You mentioned Hellboy and the manga Berserk. Are there other comics and graphic novels that have inspired you?
There are too many to really do them justice talking about them here. For ideas, Grant Morrison is my favourite, he throws out ideas that just warp my perception of reality, and with such frequency. I love Junji Ito too.

A quick Google image search on the manga artist Junji Ito has just freaked me out, but I'll try to continue. I ask a film question in every interview, so let's run with the manga theme. Which movie is best, Akira or the original Ghost in the Shell?
Probably Akira. But in terms of classic animé, you can’t beat Neon Genesis Evangelion.

Big robots! Maybe some of that inspiration is coming through in your latest project, the Verminlord? How do you plan out a model? Do you start with an accurate idea of what you want to achieve, and work to a plan, or are you experimenting wildly throughout the creation of a new piece?
Sometimes inspiration will hit me when I see a new kit, or take another look through the Forgeworld website. I don’t work to a plan except for a pretty strong idea in my mind’s eye about what the finished thing ought to look like. I have a pretty extensive bits collection, so I get all the relevant parts out in front of me, and then spend a really long time trying things out with blu-tack until it clicks.

One of Jake's most recent creations: Rattendaemon, the mechanical Verminlord

Got any tips you can share?
Well my main goal is to make models that look different to anyone else’s. So I try to find unusual base models and donor kits, or I try to adapt a model in a way that hasn’t been done before – a good one is taking a 40K kit and changing it to a Fantasy model. The quality of the components you use is also really important – starting with something like a plastic Catachan is going to be an uphill struggle.

My best tip is to use lots of blu-tack and spend a long time getting the right pose. The pose is the most important thing in a conversion in my opinion, I often think about how to pose characters in the Marvel Comic style – oh and glue the head last – even a slight adjustment or tilt can totally change the feel of the figure. If the pose is weak then it doesn’t matter how good the bits you’ve chosen are, or how good the paint is, it will be an underwhelming model.

I’m with you on the pose thing, and your models always seem particularly expressive. Ex Profundis feels like a very polished brand. Well put together, clearly defined, occupying its own space within the hobby etc. It’s a strong platform. Do you have any plans to take it elsewhere? Ever thought about releasing your own miniatures? 

Yeah maybe. I mean, at the moment it's all tied in to the Games Workshop IP so there is no question of releasing miniatures or anything like that. I’d love to develop it further though. I think there is increasing awareness of this sort of Lovecraftian horror – and I don’t mean all the cheesy Cthulhu stuff that has popped up everywhere, I mean things that evoke what Lovecraft called existential horror or dread. Kingdom Death tapped into this vein and that did pretty well. 

At the moment we welcome contributions from anyone that thinks their work fits this horror theme or offers something unusual: miniatures, fiction, art, whatever. And I am sure we would welcome another contributor if their style fit.

That’s very exciting for all the horror-inspired modellers out there. I’m sure there are lots of people who would love their work to appear on your site, or to own some twisted Ex Profundis creatures or characters.

Jake, thank you so much for taking the time to share your thoughts and insights, and good luck with all your forthcoming projects.

And to keep an eye out for Jake's forthcoming projects, or check out his and the other contributors' existing ones, including the mechanical Verminlord and all their other dark and disturbing creations, have a look at Ex Profundis here.


Friday, 18 November 2016

A touch of Foss

When we were kids being dragged around town on parental shopping expeditions, my brother and I would often attempt to break free and head for a bookshop. Not because we were insatiable consumers of the written word or anything. More like the opposite: we liked looking at pictures. So in those bookshops we headed straight to the sci-fi aisles to stare in rapt fascination at all the amazing covers with their images of huge starships, covered in patterns and graphics, cruising around the galaxy, towing asteroids, fighting off pirates or docking with glittering space stations.

It was only years later that I realised a significant proportion of these covers were painted by the same artist, Chris Foss.

Not only did Foss paint mind-blowing pictures for the covers of books, he also created concept art for several major movies. His first role in film was providing psychedelic hardware designs for Alejandro Jodorowsky's famous, but ill-fated adaptation of Frank Herbert's Dune. While working on this project he met Dan O'Bannon and H. R. Geiger. The three of them later teamed up again to work on Ridley Scott's ground-breaking Alien (1979) where Foss helped design the Nostromo. He also worked on Superman (1978), Flash Gordon (1980), A.I. Artificial Intelligence (2000), and more recently on James Gunn's adaptation of the Marvel comic Guardians of the Galaxy (2014).

His work still looks amazing today, so if you're not familiar with it, and partial to a bit of awesomeness, then look at the images tab at the top of this Google search. Or even better, if you've got some spare cash, maybe grab a copy of this collected art book, a comprehensive retrospective of all his sci-fi work.

But why have I mentioned Chris Foss?

It's to do with my latest vehicle project, another model from Ramshackle Games, the rugged-looking Rhebok APC.

Foss usually painted his vehicles on a huge scale. Ships the size of ocean liners, and trucks large enough to tow them. Unfortunately, not only is it impractical for me to indulge in a modelling project of that scale, but you don't score many points with the missus when she has to clamber over a toy spaceship the size of a car just to get to her wardrobe.

So instead I've chosen to reference something else from his signature style.

Many of Foss's vehicles are painted in bright, almost garish colours, sporting large, geometric patterns covering much of their hulls. It's these vibrant, bold, super-graphics that I've tried to allude to in the paint scheme for my Rhebok.

To keep things simple, I chose an orange base colour and applied black caution stripes following the contours of the middle section. I then tempered everything with a little weathering so it doesn't feel too bright and garish (after all, it's not Eldar).

And besides, I wanted to ensure the finished tractor feels like it belongs to the same world as all my other models.


That world is Ancora Fornax, and the Rhebok model represents a civilian tractor found in one of the larger hive cities, Kruenta Karoliina Arx Rotunda. The caution stripes (not to mention the vehicle's general design and robustness) indicate some sort of industrial usage. Perhaps this tough-looking tug is involved in the primary extraction of raw materials, or is designed to transport workers to the more hazardous environmental areas surrounding the city, or maybe it belongs to one of the starports, pulling smaller craft into bays, or transferring cargo and supplies.

As with several of my other models I like to think of it as something that could have graced the pages of one of Dan Abnett's Inquisitor books. Both his Eisenhorn and Ravenor trilogies bring civilian life in the Imperium into sharp-enough focus to see all the cracks, grime and decay, and have provided much of the inspiration for my ongoing city project.

Outside of those books, but still within the WH40K background fluff, there's the fabled civilian Land Crawler. A workhorse machine that we don't hear much about these days, and one that I probably would have forgotten altogether had it not been for Predrag Vasiljevic mentioning it on Twitter. It is meant to be one of the most ubiquitous vehicles in the Imperium, so could my tractor be some kind of local variant on the standard template version?

Like most of my projects the back-story isn't quite as important as the finished model, so whatever it turns out to be, its more essential that its bulky, hunched shape looks cool on the streets of my urban sprawl.


Henceforth known as the sprawl's rule of cool.


Tuesday, 8 November 2016

Baroque of ages

Back here I talked about being inspired to build a handful of age-old, 30K Custodes legionaries out of the single-pose Stormcast Eternals I had lying around. What I may not have mentioned is that as soon as I started this project the word 'baroque' sprung to mind.*

If you look up the definition of 'baroque' you usually get something along the lines of 'an exaggerated ornamentation, designed to evoke grandeur and exuberance'. But the origin of the word comes from the name of an unevenly shaped pearl, so I can never shake the thought that 'baroque' carries an additional meaning. That of irregularity, like the absence of pattern.

In the case of my Custodes I wanted this to manifest as an asymmetrical line down the centre of their armour. So that shoulder pads, greaves, vambraces and any off-centre decorative motifs wouldn't match from one side to the other.

After my initial drawing (in the link above), I set about scouring my various boxes of spare parts for any bits that might be relevant to this project. I also bought a few specific pieces from Craig Randall's Bitzbox.

I glued the Stormcast bodies together and started trying to remove their shoulder pads, thinking that different pauldrons would be a good way to help the finished models look unique.

Eternals without shoulders. Seen here with the first wave of bits 

In some of the Black Library's earlier Horus Heresy books I vaguely remember reading that Custodes legionaries were roughly the same size as Astartes, or perhaps only a tiny bit larger. This seemed a clear indication that their base size should be the same. So my next stop was to build a handful of 32mm bases that looked like the floor in my drawing. I glued simple plasticard squares straight to the base, with a few of the tiles broken or cracked to add interest and imply the location could be taking some hits.


Of course, now that The Burning of Prospero boxed game has been released White Dwarf Magazine has told us that Custodes are a full head taller than an average Space Marine**, and that they should be on appropriately larger bases.

In English money that makes them somewhere over 8ft tall (244cm), not counting the pointy helmet.

I'm not a fan of this particular bit of retconning, so I'll just chalk it up to the general weirdness of scale issues that pervade this hobby. Whenever I stop to think about them my model collector's OCD kicks in and I start to feel a little uneasy. I didn't want to go into it here, but I can feel a rant coming on.

Why are models of towering, superhuman Space Marines the same height as those of regular army grunts? Why do so many other models seem to be getting bigger with every new release? How are ten Terminators supposed to fit inside a Land Raider? What practical benefits are there from measuring a model's scale to its eyes? And why do hive-reared Goliath Gangers so easily dwarf the Emperor's finest genetically-enhanced elites?

I could go on, but I think I've got it out of my system for now. So thanks for sticking by me. Now back to the matter in hand.

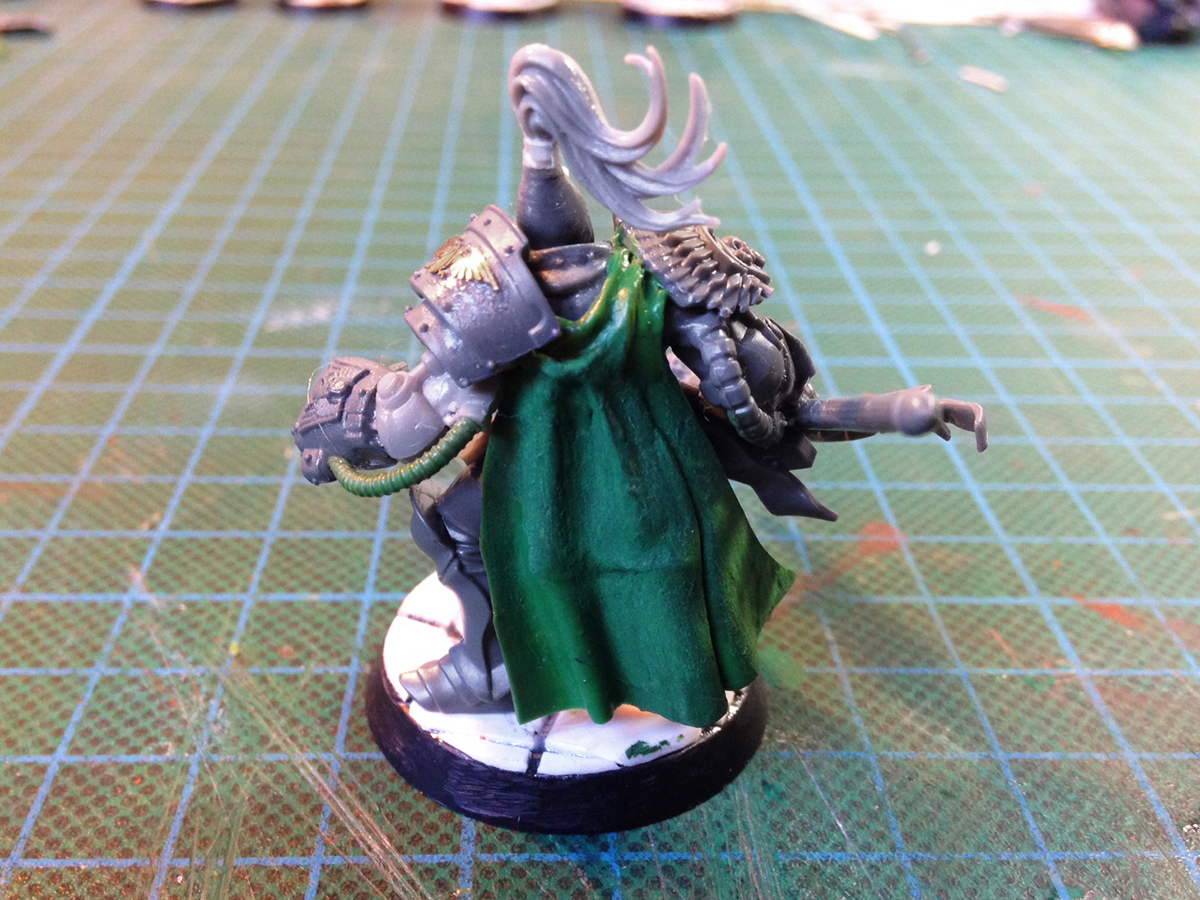
I wanted my three golden armoured warriors to not just be more realistically sized (for characters a little bigger than a Space Marine), but also to be wearing cloaks, hanging low off the back of their shoulders. The larger Stormcast models would help with the scale, but the cloaks I'd have to do by hand.

I started by rolling out three or four sheets of green stuff – each roughly twice the size of the proposed cape. After letting the sheets cure for about ten minutes, I tried to add folds by carefully scrunching them together at one end. To aid with this I experimented with rolling them around different sized paintbrush handles, although this resulted in varying degrees of success (or perhaps, more accurately, failure).


When completely dry I cut them down to size and shape, not worrying too much about the top (where they will attach to the models' backs).


At this point I started my second sweep of the bits box, looking for other pieces that could bring the models to life. Arms became quite important. At least half of mine were from Space Marine Terminators. I was also quite excited to get the heads in place. The helmets came from the grim looking High Elf Shadow Warriors kit, while the bare head is from the Space Marine Vanguard box. I wanted the sergeant to look like he based his haircut on Captain-General Constantin Valdor as a mark of fealty.


Most of the chosen bits were added to the models; and the cloaks were then glued to their backs, leaving enough space above them for me to sculpt the rest by hand.


After everything had dried I gave each cloak a couple of watered down coats of liquid green stuff to smooth out my blind mekboy sculpting work.

One of the final jobs was to build the three Guardian Spears. With Grey Knight Force Halberds as the base, I was hoping to get away with not having to do too much chopping and changing. Sadly this proved to be one of those plans that prompts people to look at you like your six-pack is three cans short of a four-pack, and the conversions ended up involving hours of fiddly drilling and glueing – technically referred to as faff.

That said, I still tried to give them all subtle differences so that each weapon appears bespoke. The sergeant's drum magazine is an obvious example of this.

When completed I positioned the weapons to make the finished squad look like they're covering a 180º forward arc.

And with that done the three warriors were finally ready for painting.


Some might say, just in time to be rendered entirely obsolete by the release of Games Workshop's Burning of Prospero game and the stunning, official versions of the Legio Custodes contained within it.

But hopefully not within earshot.


*Something I definitely mentioned was that the Custodes were not allowed to wear eagle motifs on their armour. On reading this now, I'm pretty sure that's utter horse doodoo. So apologies for that, I think I misappropriated that bit of background trivia from its correct place with the Astartes Legions of the Heresy era. Please feel free to tear me off a strip or let me know how the rule didn't apply to the Emperor's Children in the comments below.
**Wasn't that the size of a Primarch? How big are they now?


Monday, 31 October 2016

Summer's end and the aos sí

To the pagan Celts in ancient Britain, the festival of Samhain – summer's end – marked the end of the harvest season.

Many ancient Britains also believed this time of year saw a thinning of the veil between the worlds of the living and the dead – enough for supernatural beings to roam the earth. To the Gaels these creatures were known as aos sí – roughly translated as people of the burial mounds. (Female people of the burial mounds were bean sí, later pronounced banshee*.)

In the last few hundred years these two beliefs have combined to see us carving gourd vegetables from the harvest (and later just pumpkins) in an effort to ward off those restless spirits.

On Saturday I was a restless spirit myself, and only managed to get to the supermarket quite late, by which time, fortunately for me, they were practically giving their pumpkins away. The goofy vegetables were so cheap it would have been rude not to buy more than one, so I grabbed four, enough to make an entire family of the orange, border-warding jack-o'-lanterns. 

The upshot of all this is that for the next few days our house will be defended from the dead like a Mexican border would be if another certain, orange person were put in charge. Evil spirits beware. 


*Interestly for any Star Wars fans, the word sí, which became synonymous with these evil spirits, seems to be pronounced sith in its original Gaelic.


Monday, 10 October 2016

How not to go about silicone moulding

Today's entry is the first, and hopefully only, in a series of "How Not To..." guides.

It details my not-so-successful attempt to try silicone moulding for the first time.

Yet while I'm hoping to avoid more mistakes of this magnitude, it is undeniably true that I learnt a great deal from the process. So much so that it's worth documenting it here.

But before I get into that, let me ramble on for a moment about what I wanted to achieve and why.

A few weeks ago I finally got around to playing Destiny – Bungie's impressive first-person shooter (that was two years old last month). Within minutes of starting the game I had seen something that inspired* me to start this new project.

It was right at the beginning, where you spawn for the first time outside the old cosmodrome, and was pretty much the first thing you see. Take a look at this screen shot of abandoned cars, slowly rusting into oblivion (after their owners deserted them in hopes of heading off world). I figured a few of these scrapped vehicles would make great scatter terrain for the derelict areas of my city.

At roughly the same time I also happened to be prepping some sci-fi cars that I'd bought from Antenociti's Workshop. I thought they'd look fantastic as dilapidated, rusted, old hulks, but the original models were far too nice to simply ruin like that. Instead I decided I'd try to make a silicone mould of them and cast some replacements out of plaster, which I could then hack away at as much as I liked.

I'd come close to dabbling in silicone moulding before. It was about ten years ago. I'd been thinking of casting up some scratch-built architectural features (gargoyles, doors, pillars etc.) for my Chaos town project.** I'd got as far as buying the liquid rubber, the catalyst and a mixing bucket, but then my interest fizzled out and some other idea grabbed my tiny, erratic mind.

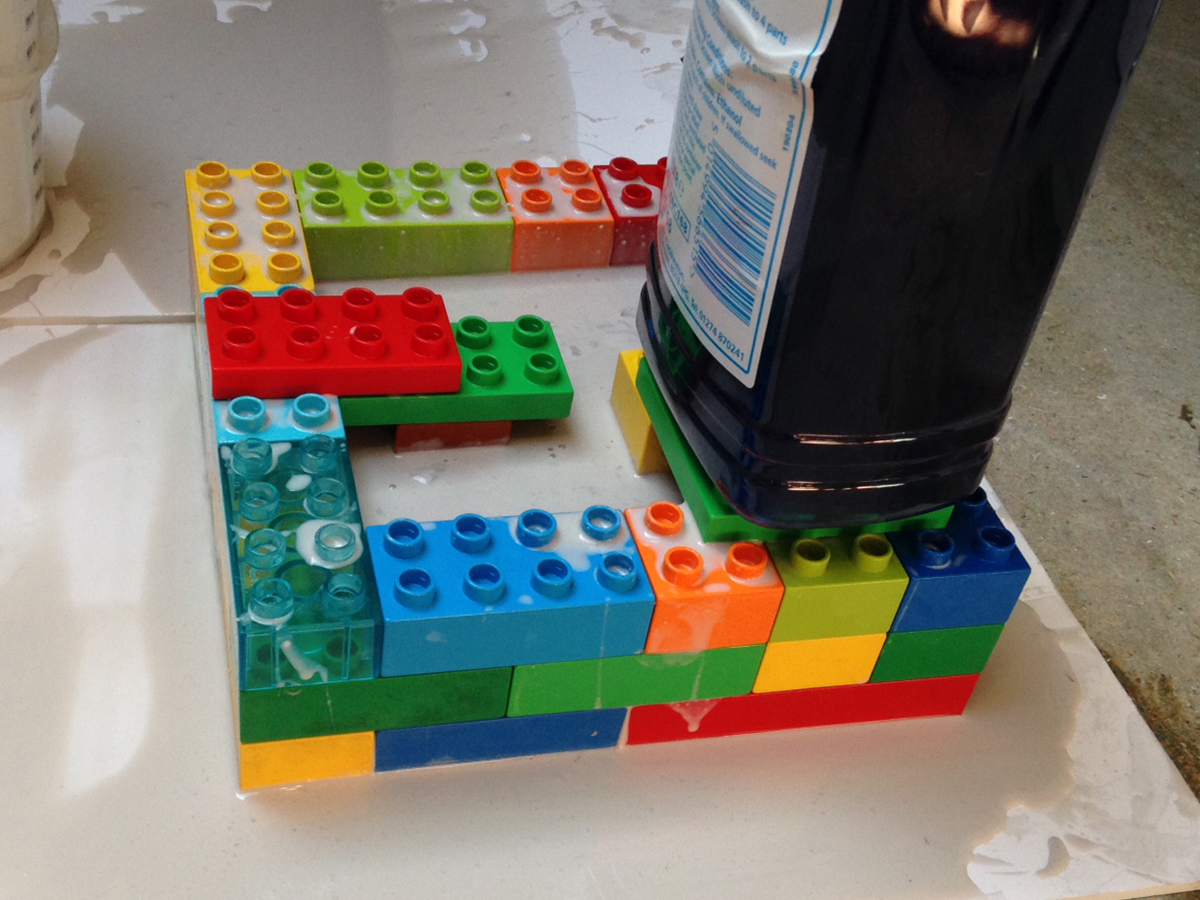
So I still had all the stuff and could remember enough from my earlier research to know that I'd need a load of Lego from which to build the mould's frame. Luck smiled on me again as my kids had a bunch of Duplo bricks that I reckoned I could appropriate for a couple of days without them noticing.

Add in some old chopsticks for mixing, and hey presto, a complete silicone moulding kit

The only problem was a tiny line of type on one of the silicone products that mentioned a six month shelf life.

A six month shelf life starting around the time I bought them, ten years ago.

Should I be worried? Nah, who looks at best before dates? When I see them on food packaging I take them as a guideline at best. Surely they're only there for legal reasons and to hasten repeat purchase? In my book food is ruined when it looks ruined, not when some imaginary date is passed. Besides, the liquid rubber looked fine, and even if it didn't work, what was the worst that could happen?

The worst, you say?

I was about to find out.

I added the liquid rubber into the mixing pot.

When I went to add the catalyst I noticed some of it didn't look right – it had crystallised a bit. But what could I do? Stop now and throw the rubber away? Or embrace the spirit of adventure and see what might happen?

So I built my Lego frame, put it on a large, flat piece of card and carefully placed the vehicles inside.


Then I poured in the thoroughly mixed rubber and catalyst, and went off to make a cup of tea, congratulating myself on how easy the whole process had been.

But by this point I had made two major mistakes.

The first was ignoring the shelf life, but can you see what the second was?

And I don't just mean all the air bubbles in the mixture

Neither the Lego nor the cars were weighed down or secured to the base. When I came back five minutes later there was liquid rubber seeping out all over the place, and the cars were floating in the meagre left-overs within the frame.

I had to think quickly, so I grabbed some spare Duplo bricks and tried to build something that would hold the cars down, and take a heavy bottle to do similar with the frame itself.


This seemed to do the job as the cars remained submerged and the frame appeared to stop leaking. I had lost a fair bit of the rubber fluid, and made quite a mess of my work area, but I figured I'd got it under control.

The instructions on the tin told me that 48 hours would be sufficient for the rubber mould to go completely solid, so I waited 2 days, popping in every now and then to check everything looked okay.

But at the end of that time the liquid rubber had not even got the slightest bit thicker. It was still a consistency somewhere between thick paint and runny yoghurt. The sell-by date was well and truly passed.

I was prepared to chalk it up as a long-shot that hadn't paid off, except there was now an awful lot of liquid rubber covering an awful lot of toys, tools and space. And most of those toys didn't even belong to me (all that Lego belonged to the kids, remember). And to make matters worse, the liquid rubber behaved just like thick, oil-based house paint. It's designed to be peeled off once it goes hard, but it's infinitely more difficult to clean when still a liquid.

In fact it was only when starting the clean-up that I realised it would take hours of careful scrubbing to return everything to its original condition.

To cut a long story short, the process of clean-up took me about six or seven hours, involved soaking everything in buckets of white spirit, used up an entire roll of kitchen paper, necessitated me throwing a lot of stuff away, and left the floor of my work space quite badly stained.

On the plus side however, the kids' Duplo now looks really clean.

And if I ever decided to do this again I'll know the importance of gluing my subject models to the base and weighing the frame down with something very heavy.

But did I want to do this again? The way I saw it I was faced with three possible ways to continue:

1) Scrap the whole project and never mention it again.

2) Start again from scratch, buying fresh silicone rubber materials, and use my new-found experience to get it right.

3) Find a completely different way to achieve the same goal.

After discovering the price of a new silicone moulding kit – something like £30 or £40 – I was pretty convinced number 2 was off the list. And 1 just sounds like defeat, so number 3 it was.

Armed with just £2 in my pocket I headed to the nearest Pound Shop where I was able to buy some toys that might just prove to be perfect for this job. If all goes according to plan it will give me four, lovely wrecked vehicles for my sci-fi city terrain, all in roughly the same scale as the original Antenociti's Workshop kits.

In fact the only downside is my recent track record regarding plans. Specifically with events not going according to them

I'm looking forward to tackling this brand-new project in the near future. I'll document any further failures here. As they say "I've learnt so much from my mistakes, I'm thinking of making a few more".


*I've been inspired by Destiny before. The concept art and screen shots sparked me into making some mercenaries and gunslingers that might be found in the bars and cantinas of Kru. You know the kind of places, wretched hives of scum and villainy. There's clearly something about the aesthetic of Destiny that appeals to my inner model maker.
**Which, despite repeated mentions, I still haven't managed to share on this blog.


Thursday, 6 October 2016

Miniature giants, part three: Stalker platform

What do you get if you cross the Space Marine Thunderfire Cannon with Johnny 5, the robot  from the movie Short Circuit?

Contrary to what you might expect from looking at the pictures below, I did not ask myself that question at any point during this project. Rather, as is often the case, when I started I only had a vague plan, knowing that I wanted to use up some of my left-over bits to create a rogue, semi-autonomous gun platform that has been stalking the derelict areas of my Imperial hive city, Kruenta Karoliina Arx Rotunda.

But the unexpected similarities between my finished model and both the Thunderfire Cannon and Johnny 5 are not necessarily a bad thing. (Certainly not if you can whip out a bit of last minute post-rationalisation.) To me those correlations simultaneously root my creation in the WH40K universe and hint at the machine having a modicum of sentience.


When starting work on the model my design brief went like this:

1) Make it look dangerous.
2) Make it look beaten-up.
3) Make it out of the Chapterhouse Studios gun turret and the old Ramshackle Games caterpillar tracks that I already had at home.


As with most of my one-off models, there's a story that goes with this. A story that first came to light among huddled hive gangers, whispering secrets and scares around barrel fires during dark nights. An urban legend that spread through the juves, jacks and scavengers fighting over territory in the decaying lost-zones of Kru. It was said that gang members entering an area known as the Twist were being hunted by a lone machine. Confused accounts of a dilapidated yet deadly weapon system, taller than a man, rumbling over the broken rock-crete, relentlessly tracking individuals through the crumbling maze of abandoned manufactorums. Seemingly knowing its way through the labyrinthine corridors and alleys better than any of the locals. Its motives unknown. And perhaps unknowable. Surrounded by a growing aura of mystery. The more reports that came in, the more questions were raised. What is it? Where did it come from? Why the random killings? Was it built in-system or imported from further afield? Could it be a prototype Astartes weapon from a long-forgotten war, or was it designed more recently? Did it reactivate by accident or is there a more malign presence at play? And who or what is keeping it supplied with fuel and ammunition?


Monday, 26 September 2016

Taming the Pegasus

One of my next projects is the Pegasus Tactical Vehicle and trailer from Puppets War. It's a sci-fi truck that offers you a choice of different configurations for the final model. 

I originally started working on this when the parts arrived last year, but only got as far as building the sub-assemblies. (For a rough guide to prepping resin models take a look here.) The reason I didn't get any further was because I liked most of the final versions of the truck and didn't want to commit to a single one. In a situation like this you would usually just magnetise the model, but there's something strange about the kit, that immediately brought my progress to a standstill.

Puppets War models are renowned for having pre-moulded holes to take magnets. But this kit, with all its interchangeable parts, didn't have any. The holes would have to be drilled by hand. And in this case it meant quite a few holes, all drilled into the finely detailed resin kit, with a drill bit nearly big enough to put up shelves.

And not just that, but the individual sub-assemblies are fairly heavy, so multiple magnets would be needed for each piece, and some of the sets of magnets would need to attach to multiple other pieces. Thus their polarity and the question of whether they repel or attract would need to be carefully considered.

So – although it doesn't look like much progress – in terms of blood, sweat, tears, and the sheer amount of mental energy I had to expend, this job felt like hard work. Long, involved, hard work, but fortunately still quite enjoyable. Maybe even more enjoyable than normal, seeing as my tiny, shrivelled brain also got a little exercise.

The first thing to do was source the magnets. Remember, when working with these powerful little blighters, to keep them away from electronic objects like mobile phones and iPads. You don't want to find the cost of the project suddenly sky-rocketing from an impromptu trip to the Apple Store.

I bought my magnets a while ago, so can't remember now, but I think I probably got them from somewhere like Element Games or Etsy or maybe even Puppets War themselves. If you always buy circular magnets with the same diameter this will help you when it comes to the next stage. This is because you will need to find a drill bit exactly the same diameter as the magnet, so:

One size magnet = only one drill bit needed.

You can check your bit is the right size either by comparing its carefully recorded size with the carefully recorded size of the magnet, or, if careful recording isn't your thing, simply let the magnet attach itself to the shaft of the drill bit and see if they look the same.

Okay, so this looks like a picture of a felt tip pen, but look closely and you can see a magnet attached to the shaft of a drill bit

The next thing for me was to find a tool that will hold the drill bit. I was lucky enough to have been given a Dremel a few years back, and even luckier that it was the right size to hold the bit.

Drill bit, Dremel and Pegasus seen here with superglue that's just itching to stick my fingers together

The three basic pieces of the model are the two trailers and the truck – all of which are sub-assemblies. Once these are in place all the other bits attach to them. For full customisation these three basic pieces need to connect to each other in a couple of different configurations. The two trailer pieces are identical, so it would also be helpful if they could both individually attach to the truck – to save you from having to work out which one is which.

This therefore left me with a problem of three-way connectivity – where every north polarity side must face a south polarity side, but all three pieces must be interchangeable with one another.

To remedy this I drilled two off-centre holes into the connecting edges of each of the three basic piecesThe off-centre holes will help solve the polarity problem and also offer up a little extra strength. 

I've put together a diagram to explain what the hell I'm going on about.


It will make more sense when you're actually doing it.

When all six holes were drilled I went about glueing the first magnet in place. But only the first magnet, as the north-south polarity problem starts to intensify right about now.


A drop of superglue in the first hole. But only a drop, and only the first hole

Push the magnet firmly into place with the end of a paintbrush.

Because the wooden paintbrush isn't magnetic

Then let that first magnet dry. A little patience here will save a lot of frustration down the line. Once it's completely stuck fast, you can let another magnet attach to it. Through magnetic attraction, that is. Don't use any glue! This effectivity tells you which way round the second magnet must go. Liberally mark the back of it with paint or ink.

Hence the felt tip pen

The second magnet will then need to be prised away from the first one, being careful not to wipe off all the ink. It can then be placed in the corresponding hole in one of the other two pieces. If you make sure the ink side isn't visible then you know you've put it in the right way round.

Mark up another magnet in the same way and place it in the third sub-assembly. When the two new magnets are dry, use them to work out which way round the other three magnets need to go. Again, this will make more sense once you have the pieces in front of you.

Once the first six magnets are placed, each of the three basic pieces should connect in every configuration 

I then repeated this process, or at least parts of it, for all the other connections. In the photo above you can see I've started to mark the position (and then, d'oh, in some cases, re-mark it slightly to the side) for all the remaining magnets. I tried to use a minimum of two pairs of magnets per piece, figuring that they'll not just hold everything firmly together, but will keep it all level too. 

Getting the holes drilled and cleaned up, working out the polarity and gluing all the magnets in place was quite fiddly and time-consuming, so I'd advise setting aside a few hours if you want to do something similar.

Once all the magnets were safely stuck in, I mixed up some grey stuff to fill any untidy holes that might be visible on the final model. I originally thought I'd skip this stage through careful drilling and gluing, but with something like 22 holes in total, I just couldn't keep it all neat.


While letting the grey stuff dry on all the other pieces, I used a piece of plasticard to cover the bottom of the container, thereby hiding four magnets in one go and giving the model a nice, smooth base. Once everything was dry I smoothed the grey stuff and plasticard with a file and made all my alterations as tidy as possible.

After this there was only one job left to complete the task. The tow hook that connects the container to the truck needs to be easily removable, but there is very little space on the truck to house a magnet. So for this last connection, I drilled out the hook and built a corresponding area on the truck's undercarriage out of grey stuff. From most angles it will remain hidden, so it didn't need to be brilliant work.

And it wasn't

With that dried and filed smooth (ish) I was able to move on to the undercoat stage. The best part of a can of Games Workshop's black primer later and the whole thing looked like this.


And so I was finally able to put the truck together to see some of those different configurations I was so keen on.


All that's left for me now is to work out a colour scheme that keeps everything together, and then try to paint it.