Monday, 31 October 2016

Summer's end and the aos sí

To the pagan Celts in ancient Britain, the festival of Samhain – summer's end – marked the end of the harvest season.

Many ancient Britains also believed this time of year saw a thinning of the veil between the worlds of the living and the dead – enough for supernatural beings to roam the earth. To the Gaels these creatures were known as aos sí – roughly translated as people of the burial mounds. (Female people of the burial mounds were bean sí, later pronounced banshee*.)

In the last few hundred years these two beliefs have combined to see us carving gourd vegetables from the harvest (and later just pumpkins) in an effort to ward off those restless spirits.

On Saturday I was a restless spirit myself, and only managed to get to the supermarket quite late, by which time, fortunately for me, they were practically giving their pumpkins away. The goofy vegetables were so cheap it would have been rude not to buy more than one, so I grabbed four, enough to make an entire family of the orange, border-warding jack-o'-lanterns. 

The upshot of all this is that for the next few days our house will be defended from the dead like a Mexican border would be if another certain, orange person were put in charge. Evil spirits beware. 


*Interestly for any Star Wars fans, the word sí, which became synonymous with these evil spirits, seems to be pronounced sith in its original Gaelic.


Monday, 10 October 2016

How not to go about silicone moulding

Today's entry is the first, and hopefully only, in a series of "How Not To..." guides.

It details my not-so-successful attempt to try silicone moulding for the first time.

Yet while I'm hoping to avoid more mistakes of this magnitude, it is undeniably true that I learnt a great deal from the process. So much so that it's worth documenting it here.

But before I get into that, let me ramble on for a moment about what I wanted to achieve and why.

A few weeks ago I finally got around to playing Destiny – Bungie's impressive first-person shooter (that was two years old last month). Within minutes of starting the game I had seen something that inspired* me to start this new project.

It was right at the beginning, where you spawn for the first time outside the old cosmodrome, and was pretty much the first thing you see. Take a look at this screen shot of abandoned cars, slowly rusting into oblivion (after their owners deserted them in hopes of heading off world). I figured a few of these scrapped vehicles would make great scatter terrain for the derelict areas of my city.

At roughly the same time I also happened to be prepping some sci-fi cars that I'd bought from Antenociti's Workshop. I thought they'd look fantastic as dilapidated, rusted, old hulks, but the original models were far too nice to simply ruin like that. Instead I decided I'd try to make a silicone mould of them and cast some replacements out of plaster, which I could then hack away at as much as I liked.

I'd come close to dabbling in silicone moulding before. It was about ten years ago. I'd been thinking of casting up some scratch-built architectural features (gargoyles, doors, pillars etc.) for my Chaos town project.** I'd got as far as buying the liquid rubber, the catalyst and a mixing bucket, but then my interest fizzled out and some other idea grabbed my tiny, erratic mind.

So I still had all the stuff and could remember enough from my earlier research to know that I'd need a load of Lego from which to build the mould's frame. Luck smiled on me again as my kids had a bunch of Duplo bricks that I reckoned I could appropriate for a couple of days without them noticing.

Add in some old chopsticks for mixing, and hey presto, a complete silicone moulding kit

The only problem was a tiny line of type on one of the silicone products that mentioned a six month shelf life.

A six month shelf life starting around the time I bought them, ten years ago.

Should I be worried? Nah, who looks at best before dates? When I see them on food packaging I take them as a guideline at best. Surely they're only there for legal reasons and to hasten repeat purchase? In my book food is ruined when it looks ruined, not when some imaginary date is passed. Besides, the liquid rubber looked fine, and even if it didn't work, what was the worst that could happen?

The worst, you say?

I was about to find out.

I added the liquid rubber into the mixing pot.

When I went to add the catalyst I noticed some of it didn't look right – it had crystallised a bit. But what could I do? Stop now and throw the rubber away? Or embrace the spirit of adventure and see what might happen?

So I built my Lego frame, put it on a large, flat piece of card and carefully placed the vehicles inside.


Then I poured in the thoroughly mixed rubber and catalyst, and went off to make a cup of tea, congratulating myself on how easy the whole process had been.

But by this point I had made two major mistakes.

The first was ignoring the shelf life, but can you see what the second was?

And I don't just mean all the air bubbles in the mixture

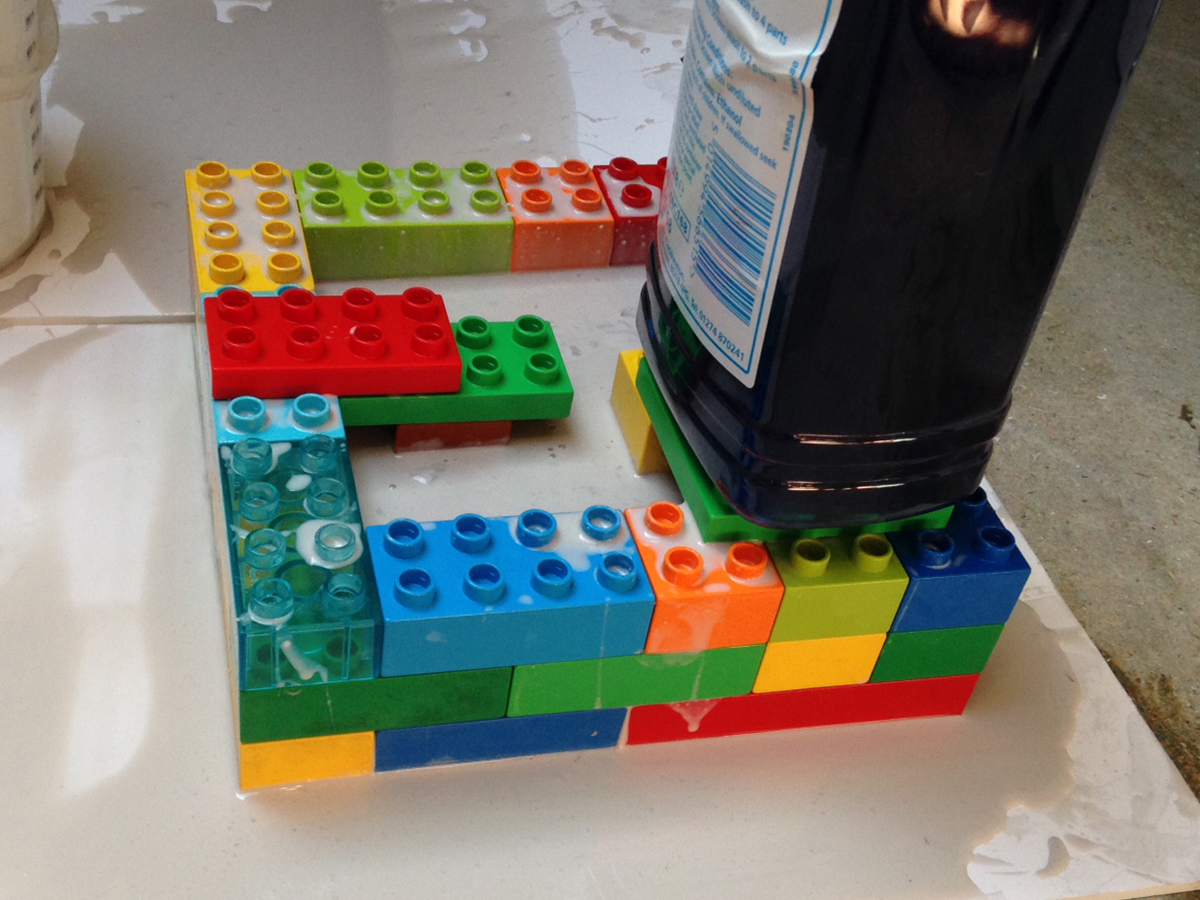
Neither the Lego nor the cars were weighed down or secured to the base. When I came back five minutes later there was liquid rubber seeping out all over the place, and the cars were floating in the meagre left-overs within the frame.

I had to think quickly, so I grabbed some spare Duplo bricks and tried to build something that would hold the cars down, and take a heavy bottle to do similar with the frame itself.


This seemed to do the job as the cars remained submerged and the frame appeared to stop leaking. I had lost a fair bit of the rubber fluid, and made quite a mess of my work area, but I figured I'd got it under control.

The instructions on the tin told me that 48 hours would be sufficient for the rubber mould to go completely solid, so I waited 2 days, popping in every now and then to check everything looked okay.

But at the end of that time the liquid rubber had not even got the slightest bit thicker. It was still a consistency somewhere between thick paint and runny yoghurt. The sell-by date was well and truly passed.

I was prepared to chalk it up as a long-shot that hadn't paid off, except there was now an awful lot of liquid rubber covering an awful lot of toys, tools and space. And most of those toys didn't even belong to me (all that Lego belonged to the kids, remember). And to make matters worse, the liquid rubber behaved just like thick, oil-based house paint. It's designed to be peeled off once it goes hard, but it's infinitely more difficult to clean when still a liquid.

In fact it was only when starting the clean-up that I realised it would take hours of careful scrubbing to return everything to its original condition.

To cut a long story short, the process of clean-up took me about six or seven hours, involved soaking everything in buckets of white spirit, used up an entire roll of kitchen paper, necessitated me throwing a lot of stuff away, and left the floor of my work space quite badly stained.

On the plus side however, the kids' Duplo now looks really clean.

And if I ever decided to do this again I'll know the importance of gluing my subject models to the base and weighing the frame down with something very heavy.

But did I want to do this again? The way I saw it I was faced with three possible ways to continue:

1) Scrap the whole project and never mention it again.

2) Start again from scratch, buying fresh silicone rubber materials, and use my new-found experience to get it right.

3) Find a completely different way to achieve the same goal.

After discovering the price of a new silicone moulding kit – something like £30 or £40 – I was pretty convinced number 2 was off the list. And 1 just sounds like defeat, so number 3 it was.

Armed with just £2 in my pocket I headed to the nearest Pound Shop where I was able to buy some toys that might just prove to be perfect for this job. If all goes according to plan it will give me four, lovely wrecked vehicles for my sci-fi city terrain, all in roughly the same scale as the original Antenociti's Workshop kits.

In fact the only downside is my recent track record regarding plans. Specifically with events not going according to them

I'm looking forward to tackling this brand-new project in the near future. I'll document any further failures here. As they say "I've learnt so much from my mistakes, I'm thinking of making a few more".


*I've been inspired by Destiny before. The concept art and screen shots sparked me into making some mercenaries and gunslingers that might be found in the bars and cantinas of Kru. You know the kind of places, wretched hives of scum and villainy. There's clearly something about the aesthetic of Destiny that appeals to my inner model maker.
**Which, despite repeated mentions, I still haven't managed to share on this blog.


Thursday, 6 October 2016

Miniature giants, part three: Stalker platform

What do you get if you cross the Space Marine Thunderfire Cannon with Johnny 5, the robot  from the movie Short Circuit?

Contrary to what you might expect from looking at the pictures below, I did not ask myself that question at any point during this project. Rather, as is often the case, when I started I only had a vague plan, knowing that I wanted to use up some of my left-over bits to create a rogue, semi-autonomous gun platform that has been stalking the derelict areas of my Imperial hive city, Kruenta Karoliina Arx Rotunda.

But the unexpected similarities between my finished model and both the Thunderfire Cannon and Johnny 5 are not necessarily a bad thing. (Certainly not if you can whip out a bit of last minute post-rationalisation.) To me those correlations simultaneously root my creation in the WH40K universe and hint at the machine having a modicum of sentience.


When starting work on the model my design brief went like this:

1) Make it look dangerous.
2) Make it look beaten-up.
3) Make it out of the Chapterhouse Studios gun turret and the old Ramshackle Games caterpillar tracks that I already had at home.


As with most of my one-off models, there's a story that goes with this. A story that first came to light among huddled hive gangers, whispering secrets and scares around barrel fires during dark nights. An urban legend that spread through the juves, jacks and scavengers fighting over territory in the decaying lost-zones of Kru. It was said that gang members entering an area known as the Twist were being hunted by a lone machine. Confused accounts of a dilapidated yet deadly weapon system, taller than a man, rumbling over the broken rock-crete, relentlessly tracking individuals through the crumbling maze of abandoned manufactorums. Seemingly knowing its way through the labyrinthine corridors and alleys better than any of the locals. Its motives unknown. And perhaps unknowable. Surrounded by a growing aura of mystery. The more reports that came in, the more questions were raised. What is it? Where did it come from? Why the random killings? Was it built in-system or imported from further afield? Could it be a prototype Astartes weapon from a long-forgotten war, or was it designed more recently? Did it reactivate by accident or is there a more malign presence at play? And who or what is keeping it supplied with fuel and ammunition?


Monday, 26 September 2016

Taming the Pegasus

One of my next projects is the Pegasus Tactical Vehicle and trailer from Puppets War. It's a sci-fi truck that offers you a choice of different configurations for the final model. 

I originally started working on this when the parts arrived last year, but only got as far as building the sub-assemblies. (For a rough guide to prepping resin models take a look here.) The reason I didn't get any further was because I liked most of the final versions of the truck and didn't want to commit to a single one. In a situation like this you would usually just magnetise the model, but there's something strange about the kit, that immediately brought my progress to a standstill.

Puppets War models are renowned for having pre-moulded holes to take magnets. But this kit, with all its interchangeable parts, didn't have any. The holes would have to be drilled by hand. And in this case it meant quite a few holes, all drilled into the finely detailed resin kit, with a drill bit nearly big enough to put up shelves.

And not just that, but the individual sub-assemblies are fairly heavy, so multiple magnets would be needed for each piece, and some of the sets of magnets would need to attach to multiple other pieces. Thus their polarity and the question of whether they repel or attract would need to be carefully considered.

So – although it doesn't look like much progress – in terms of blood, sweat, tears, and the sheer amount of mental energy I had to expend, this job felt like hard work. Long, involved, hard work, but fortunately still quite enjoyable. Maybe even more enjoyable than normal, seeing as my tiny, shrivelled brain also got a little exercise.

The first thing to do was source the magnets. Remember, when working with these powerful little blighters, to keep them away from electronic objects like mobile phones and iPads. You don't want to find the cost of the project suddenly sky-rocketing from an impromptu trip to the Apple Store.

I bought my magnets a while ago, so can't remember now, but I think I probably got them from somewhere like Element Games or Etsy or maybe even Puppets War themselves. If you always buy circular magnets with the same diameter this will help you when it comes to the next stage. This is because you will need to find a drill bit exactly the same diameter as the magnet, so:

One size magnet = only one drill bit needed.

You can check your bit is the right size either by comparing its carefully recorded size with the carefully recorded size of the magnet, or, if careful recording isn't your thing, simply let the magnet attach itself to the shaft of the drill bit and see if they look the same.

Okay, so this looks like a picture of a felt tip pen, but look closely and you can see a magnet attached to the shaft of a drill bit

The next thing for me was to find a tool that will hold the drill bit. I was lucky enough to have been given a Dremel a few years back, and even luckier that it was the right size to hold the bit.

Drill bit, Dremel and Pegasus seen here with superglue that's just itching to stick my fingers together

The three basic pieces of the model are the two trailers and the truck – all of which are sub-assemblies. Once these are in place all the other bits attach to them. For full customisation these three basic pieces need to connect to each other in a couple of different configurations. The two trailer pieces are identical, so it would also be helpful if they could both individually attach to the truck – to save you from having to work out which one is which.

This therefore left me with a problem of three-way connectivity – where every north polarity side must face a south polarity side, but all three pieces must be interchangeable with one another.

To remedy this I drilled two off-centre holes into the connecting edges of each of the three basic pieces. The off-centre holes will help solve the polarity problem and also offer up a little extra strength. 

I've put together a diagram to explain what the hell I'm going on about.


It will make more sense when you're actually doing it.

When all six holes were drilled I went about glueing the first magnet in place. But only the first magnet, as the north-south polarity problem starts to intensify right about now.


A drop of superglue in the first hole. But only a drop, and only the first hole

Push the magnet firmly into place with the end of a paintbrush.

Because the wooden paintbrush isn't magnetic

Then let that first magnet dry. A little patience here will save a lot of frustration down the line. Once it's completely stuck fast, you can let another magnet attach to it. Through magnetic attraction, that is. Don't use any glue! This effectivity tells you which way round the second magnet must go. Liberally mark the back of it with paint or ink.

Hence the felt tip pen

The second magnet will then need to be prised away from the first one, being careful not to wipe off all the ink. It can then be placed in the corresponding hole in one of the other two pieces. If you make sure the ink side isn't visible then you know you've put it in the right way round.

Mark up another magnet in the same way and place it in the third sub-assembly. When the two new magnets are dry, use them to work out which way round the other three magnets need to go. Again, this will make more sense once you have the pieces in front of you.

Once the first six magnets are placed, each of the three basic pieces should connect in every configuration 

I then repeated this process, or at least parts of it, for all the other connections. In the photo above you can see I've started to mark the position (and then, d'oh, in some cases, re-mark it slightly to the side) for all the remaining magnets. I tried to use a minimum of two pairs of magnets per piece, figuring that they'll not just hold everything firmly together, but will keep it all level too. 

Getting the holes drilled and cleaned up, working out the polarity and gluing all the magnets in place was quite fiddly and time-consuming, so I'd advise setting aside a few hours if you want to do something similar.

Once all the magnets were safely stuck in, I mixed up some grey stuff to fill any untidy holes that might be visible on the final model. I originally thought I'd skip this stage through careful drilling and gluing, but with something like 22 holes in total, I just couldn't keep it all neat.


While letting the grey stuff dry on all the other pieces, I used a piece of plasticard to cover the bottom of the container, thereby hiding four magnets in one go and giving the model a nice, smooth base. Once everything was dry I smoothed the grey stuff and plasticard with a file and made all my alterations as tidy as possible.

After this there was only one job left to complete the task. The tow hook that connects the container to the truck needs to be easily removable, but there is very little space on the truck to house a magnet. So for this last connection, I drilled out the hook and built a corresponding area on the truck's undercarriage out of grey stuff. From most angles it will remain hidden, so it didn't need to be brilliant work.

And it wasn't

With that dried and filed smooth (ish) I was able to move on to the undercoat stage. The best part of a can of Games Workshop's black primer later and the whole thing looked like this.


And so I was finally able to put the truck together to see some of those different configurations I was so keen on.


All that's left for me now is to work out a colour scheme that keeps everything together, and then try to paint it.


Tuesday, 20 September 2016

Burning desires

I hadn't originally planned to interrupt all my current vehicle projects until I'd completely cleared my desk. I wanted to power through all my civilian trucks, cars and random others, and get everything built, painted and photographed before I moved on to one of the other projects I've got sitting in the sidelines. But news of the impending release of the Burning of Prospero boardgame next month, and a conversation I had on Twitter with Grimdark, Joe Simner, Penguinius and Primordius Nul convinced me to bring something forward.

The Burning of Prospero is Games Workshop's second release in its Horus Heresy boxed game series, presumably recounting some of the battles fought when Leman Russ and his Wolves were sanctioned by the Emperor to raze the Thousand Sons' homeworld.

As well as potentially including a Space Marine armour mark never before seen in plastic, the game will also feature some characters we haven't seen as official models* for a very long time: the Emperor's elite bodyguard, the Watchers of the Throne, protectors of the Imperial Palace, defenders of the Eternity Gate, the Dread Guardians themselves, yes that's right it's the warriors of the Legio Custodes. You can see what I think may be the only previous official model to come out of the hallowed halls of the Citadel design foundry here, top left, in the Forces of the Imperium release of 1991.

If you know of any other models, please let me know in the comments below.

In the meantime I've also tried to gather together lots of images of Custodes in one easy-to-reference place – a Pinterest page full of inspiring art and miniatures, both official and fan-made. It's already chock-full, but no doubt there will be more to come in the near future.

I had been planning to build a couple of these golden armoured warriors** from the handful of snap-fit Stormcast Eternals I bought just after the release of Age of Sigmar. I put together a bunch of interesting-looking conversion bits and then sat down to draw what I thought a final character might look like. Below is an animated gif of the illustration process.

In real life it took me much longer to get from original sketch to finished image

If you look very closely you can see that the original sketch included a backpack. But as it developed and I did a little more research I realised I preferred the idea that Custodes armour incorporates the power pack into its existing bulk, and that they therefore don't need them mounted on their backs. I also realised that, contrary to early Imperial doctrine, my Custodes should be allowed to wear eagle motifs as decoration on their armour. This is not because they are supposed to be from a time after the ban was lifted, but simply because the wings and beaks add an instant level of ornamentation, without which I'd have to struggle to sculpt lots of artful swirly bits and lightning bolts.

Anyway, I started work on the first model last weekend, so with a little luck I'll be posting some progress here very soon. Watch out for the watchmen.

*Because the game will feature LEGIO Custodes models, and the previous model was meant to depict one of their descendents, the ADEPTUS Custodes, it could be argued*** that we've never had official miniatures of this troop type.
**In the first incarnation of Warhammer 40,000 the Custodes were bare-chested, and wore almost no armour other than their distinct, tall, crested helmets. Some might argue*** they looked a little silly.
***Who is doing all this arguing?


Thursday, 15 September 2016

'Splodey time

It's popular in shoot 'em up video games to have explosive red barrels dotted around the place to help you clear rooms full of bad guys. You know the kind of thing, you're out of grenades and an entire column of enemy troops is advancing towards you in a tightly packed formation, right past that bright red barrel of high explosives that someone just happened to leave lying about.

So I thought this might be an interesting idea to port to tabletop wargaming. In Inquisimunda or Kill Team style games, red barrels could add a bit of pyrotechnic flare. They could be strategically placed near an enemy HQ, so that underdogs, if they can get a character to a specified location, can shoot at them in an attempt to set off a big bang and level the playing field. (Literally level it and everything in it, for, say, a 6 inch radius.)

And in larger games, like WH40K, it could  – as per any of my other civilian vehicles – just be left hanging around the place for a little extra texture. Like a piece of scenery. Except it might be one you wouldn't want to hide behind in a firefight.

The model I've just finished painting is a tracked variant – a fuel trailer, based mainly on some interesting bits 'n' bobs I had left over from an old wartrakk skorcha I converted a few years ago (more on that in a later post). This means I have a third possibility for the use of this thing. I can add it to my Ork armoured brigade. This makes sense for two reasons:

1) Like many Ork armies, mine uses red as a major part of their livery.

2) Orks are exactly the kind of idiots who would leave a highly explosive red barrel in their frontline.


I plan to get back to my Orks at some point in the near future. I'll share them all here when I do. I just need to finish my vehicle project first. And the city itself. And my Arbites. And the servitor/denizens. And those gunslingers, and, and, and...


Wednesday, 14 September 2016

That new car feeling

I'm currently going through a phase of working on civilian vehicles for my Warhammer 40,000 Imperial Hive City, Kruenta Karoliina Arx Rotunda.

If you read this blog regularly you might be getting a little bored of hearing that opening sentence, so I apologise. I'm not trying to annoy you. Just try to think of my introductory line as the bit you used to find at the beginning of a serialised TV show – back before boxset culture was so firmly established, and we didn't watch entire shows over the course of a marathon binge weekend. You know the part I'm talking about, where pertinent clips from old episodes were played and the narrator said "Previously on 24", or whatever the name of the show was. It's the catch-up that helped you pick up the story after a week's absence.

So, back to the matter in hand, previously on Torva Tenebris, I was talking about looking at cars and stuff.

As part of this I recently bought a couple of small kits from another of my favourite manufacturers, Antenociti's Workshop. It's a website full of great gear, and if you're into this kind of thing, and not yet familiar with them, then put aside an hour or so and go and get lost in their inventory.

The two vehicles I bought were the Nemesis Police Car and the Marrua Gaucho. Here's a shot of all the components, and the condition they turned up in.

Pretty darn good if you ask me

For the rest of this post I'll just quickly cover the few basic steps I went through to prepare the models for painting. I apologise (again) if this is all a little too kindergarten for you.

With resin kits, before you do anything else, you are always advised to give them a good scrub to clean off all the mould release agent.* I left mine in the sink (with water and washing-up liquid) to soak for about an hour first, then went at them with an old toothbrush.

Probably best not to use the brush on your teeth afterwards


After a little more soaking, I rinsed them several times and left them to dry. I then started work on the flash – the little bits of resin that creep through the gaps in the mould and aren't really supposed to be there. For big kits it's worth investing in a big file – this will really speed up the process.

Just to confirm I was not paid by B&Q for the placement of their product


The bodies of the cars hardly needed any work, but the wheels were slightly more involved. And I used a scalpel, rather than a file, to carefully remove any excess from those delicate looking bullbars. Once this was done, I brushed off all the resin powder, and realised it might have made more sense to file first, wash second.

Either way, the models were then ready for some glue. I wanted the wheels to stick out slightly further than my (freshly-filed) wheels were doing, so I stuck a small washer to the back of each wheel, before attaching them to the main bodies.


I didn't glue the bullbars to the Nemesis, as I thought they might interfere with the painting at a later stage, so have only attached them lightly for the benefit of the photo. I'l remove them again before I spray the undercoat.

There was one other stage I went through in prepping these cars. It wasn't relevant to the process, and it didn't work out so well – you might even say it was a complete disaster – so I won't go into it now, but will instead attempt to re-live the whole story in a later post.

It may take me a while to summon the courage.


*Do people wash plastic kits as well? I don't. Perhaps the injection moulding process doesn't require
 release agent? Or maybe I'm doing it all wrong?