Monday, 26 September 2016

Taming the Pegasus

One of my next projects is the Pegasus Tactical Vehicle and trailer from Puppets War. It's a sci-fi truck that offers you a choice of different configurations for the final model. 

I originally started working on this when the parts arrived last year, but only got as far as building the sub-assemblies. (For a rough guide to prepping resin models take a look here.) The reason I didn't get any further was because I liked most of the final versions of the truck and didn't want to commit to a single one. In a situation like this you would usually just magnetise the model, but there's something strange about the kit, that immediately brought my progress to a standstill.

Puppets War models are renowned for having pre-moulded holes to take magnets. But this kit, with all its interchangeable parts, didn't have any. The holes would have to be drilled by hand. And in this case it meant quite a few holes, all drilled into the finely detailed resin kit, with a drill bit nearly big enough to put up shelves.

And not just that, but the individual sub-assemblies are fairly heavy, so multiple magnets would be needed for each piece, and some of the sets of magnets would need to attach to multiple other pieces. Thus their polarity and the question of whether they repel or attract would need to be carefully considered.

So – although it doesn't look like much progress – in terms of blood, sweat, tears, and the sheer amount of mental energy I had to expend, this job felt like hard work. Long, involved, hard work, but fortunately still quite enjoyable. Maybe even more enjoyable than normal, seeing as my tiny, shrivelled brain also got a little exercise.

The first thing to do was source the magnets. Remember, when working with these powerful little blighters, to keep them away from electronic objects like mobile phones and iPads. You don't want to find the cost of the project suddenly sky-rocketing from an impromptu trip to the Apple Store.

I bought my magnets a while ago, so can't remember now, but I think I probably got them from somewhere like Element Games or Etsy or maybe even Puppets War themselves. If you always buy circular magnets with the same diameter this will help you when it comes to the next stage. This is because you will need to find a drill bit exactly the same diameter as the magnet, so:

One size magnet = only one drill bit needed.

You can check your bit is the right size either by comparing its carefully recorded size with the carefully recorded size of the magnet, or, if careful recording isn't your thing, simply let the magnet attach itself to the shaft of the drill bit and see if they look the same.

Okay, so this looks like a picture of a felt tip pen, but look closely and you can see a magnet attached to the shaft of a drill bit

The next thing for me was to find a tool that will hold the drill bit. I was lucky enough to have been given a Dremel a few years back, and even luckier that it was the right size to hold the bit.

Drill bit, Dremel and Pegasus seen here with superglue that's just itching to stick my fingers together

The three basic pieces of the model are the two trailers and the truck – all of which are sub-assemblies. Once these are in place all the other bits attach to them. For full customisation these three basic pieces need to connect to each other in a couple of different configurations. The two trailer pieces are identical, so it would also be helpful if they could both individually attach to the truck – to save you from having to work out which one is which.

This therefore left me with a problem of three-way connectivity – where every north polarity side must face a south polarity side, but all three pieces must be interchangeable with one another.

To remedy this I drilled two off-centre holes into the connecting edges of each of the three basic piecesThe off-centre holes will help solve the polarity problem and also offer up a little extra strength. 

I've put together a diagram to explain what the hell I'm going on about.


It will make more sense when you're actually doing it.

When all six holes were drilled I went about glueing the first magnet in place. But only the first magnet, as the north-south polarity problem starts to intensify right about now.


A drop of superglue in the first hole. But only a drop, and only the first hole

Push the magnet firmly into place with the end of a paintbrush.

Because the wooden paintbrush isn't magnetic

Then let that first magnet dry. A little patience here will save a lot of frustration down the line. Once it's completely stuck fast, you can let another magnet attach to it. Through magnetic attraction, that is. Don't use any glue! This effectivity tells you which way round the second magnet must go. Liberally mark the back of it with paint or ink.

Hence the felt tip pen

The second magnet will then need to be prised away from the first one, being careful not to wipe off all the ink. It can then be placed in the corresponding hole in one of the other two pieces. If you make sure the ink side isn't visible then you know you've put it in the right way round.

Mark up another magnet in the same way and place it in the third sub-assembly. When the two new magnets are dry, use them to work out which way round the other three magnets need to go. Again, this will make more sense once you have the pieces in front of you.

Once the first six magnets are placed, each of the three basic pieces should connect in every configuration 

I then repeated this process, or at least parts of it, for all the other connections. In the photo above you can see I've started to mark the position (and then, d'oh, in some cases, re-mark it slightly to the side) for all the remaining magnets. I tried to use a minimum of two pairs of magnets per piece, figuring that they'll not just hold everything firmly together, but will keep it all level too. 

Getting the holes drilled and cleaned up, working out the polarity and gluing all the magnets in place was quite fiddly and time-consuming, so I'd advise setting aside a few hours if you want to do something similar.

Once all the magnets were safely stuck in, I mixed up some grey stuff to fill any untidy holes that might be visible on the final model. I originally thought I'd skip this stage through careful drilling and gluing, but with something like 22 holes in total, I just couldn't keep it all neat.


While letting the grey stuff dry on all the other pieces, I used a piece of plasticard to cover the bottom of the container, thereby hiding four magnets in one go and giving the model a nice, smooth base. Once everything was dry I smoothed the grey stuff and plasticard with a file and made all my alterations as tidy as possible.

After this there was only one job left to complete the task. The tow hook that connects the container to the truck needs to be easily removable, but there is very little space on the truck to house a magnet. So for this last connection, I drilled out the hook and built a corresponding area on the truck's undercarriage out of grey stuff. From most angles it will remain hidden, so it didn't need to be brilliant work.

And it wasn't

With that dried and filed smooth (ish) I was able to move on to the undercoat stage. The best part of a can of Games Workshop's black primer later and the whole thing looked like this.


And so I was finally able to put the truck together to see some of those different configurations I was so keen on.


All that's left for me now is to work out a colour scheme that keeps everything together, and then try to paint it.


Tuesday, 20 September 2016

Burning desires

I hadn't originally planned to interrupt all my current vehicle projects until I'd completely cleared my desk. I wanted to power through all my civilian trucks, cars and random others, and get everything built, painted and photographed before I moved on to one of the other projects I've got sitting in the sidelines. But news of the impending release of the Burning of Prospero boardgame next month, and a conversation I had on Twitter with Grimdark, Joe Simner, Penguinius and Primordius Nul convinced me to bring something forward.

The Burning of Prospero is Games Workshop's second release in its Horus Heresy boxed game series, presumably recounting some of the battles fought when Leman Russ and his Wolves were sanctioned by the Emperor to raze the Thousand Sons' homeworld.

As well as potentially including a Space Marine armour mark never before seen in plastic, the game will also feature some characters we haven't seen as official models* for a very long time: the Emperor's elite bodyguard, the Watchers of the Throne, protectors of the Imperial Palace, defenders of the Eternity Gate, the Dread Guardians themselves, yes that's right it's the warriors of the Legio Custodes. You can see what I think may be the only previous official model to come out of the hallowed halls of the Citadel design foundry here, top left, in the Forces of the Imperium release of 1991.

If you know of any other models, please let me know in the comments below.

In the meantime I've also tried to gather together lots of images of Custodes in one easy-to-reference place – a Pinterest page full of inspiring art and miniatures, both official and fan-made. It's already chock-full, but no doubt there will be more to come in the near future.

I had been planning to build a couple of these golden armoured warriors** from the handful of snap-fit Stormcast Eternals I bought just after the release of Age of Sigmar. I put together a bunch of interesting-looking conversion bits and then sat down to draw what I thought a final character might look like. Below is an animated gif of the illustration process.

In real life it took me much longer to get from original sketch to finished image

If you look very closely you can see that the original sketch included a backpack. But as it developed and I did a little more research I realised I preferred the idea that Custodes armour incorporates the power pack into its existing bulk, and that they therefore don't need them mounted on their backs. I also realised that, contrary to early Imperial doctrine, my Custodes should be allowed to wear eagle motifs as decoration on their armour. This is not because they are supposed to be from a time after the ban was lifted, but simply because the wings and beaks add an instant level of ornamentation, without which I'd have to struggle to sculpt lots of artful swirly bits and lightning bolts.

Anyway, I started work on the first model last weekend, so with a little luck I'll be posting some progress here very soon. Watch out for the watchmen.

*Because the game will feature LEGIO Custodes models, and the previous model was meant to depict one of their descendents, the ADEPTUS Custodes, it could be argued*** that we've never had official miniatures of this troop type.
**In the first incarnation of Warhammer 40,000 the Custodes were bare-chested, and wore almost no armour other than their distinct, tall, crested helmets. Some might argue*** they looked a little silly.
***Who is doing all this arguing?


Thursday, 15 September 2016

'Splodey time

It's popular in shoot 'em up video games to have explosive red barrels dotted around the place to help you clear rooms full of bad guys. You know the kind of thing, you're out of grenades and an entire column of enemy troops is advancing towards you in a tightly packed formation, right past that bright red barrel of high explosives that someone just happened to leave lying about.

So I thought this might be an interesting idea to port to tabletop wargaming. In Inquisimunda or Kill Team style games, red barrels could add a bit of pyrotechnic flare. They could be strategically placed near an enemy HQ, so that underdogs, if they can get a character to a specified location, can shoot at them in an attempt to set off a big bang and level the playing field. (Literally level it and everything in it, for, say, a 6 inch radius.)

And in larger games, like WH40K, it could  – as per any of my other civilian vehicles – just be left hanging around the place for a little extra texture. Like a piece of scenery. Except it might be one you wouldn't want to hide behind in a firefight.

The model I've just finished painting is a tracked variant – a fuel trailer, based mainly on some interesting bits 'n' bobs I had left over from an old wartrakk skorcha I converted a few years ago (more on that in a later post). This means I have a third possibility for the use of this thing. I can add it to my Ork armoured brigade. This makes sense for two reasons:

1) Like many Ork armies, mine uses red as a major part of their livery.

2) Orks are exactly the kind of idiots who would leave a highly explosive red barrel in their frontline.


I plan to get back to my Orks at some point in the near future. I'll share them all here when I do. I just need to finish my vehicle project first. And the city itself. And my Arbites. And the servitor/denizens. And those gunslingers, and, and, and...


Wednesday, 14 September 2016

That new car feeling

I'm currently going through a phase of working on civilian vehicles for my Warhammer 40,000 Imperial Hive City, Kruenta Karoliina Arx Rotunda.

If you read this blog regularly you might be getting a little bored of hearing that opening sentence, so I apologise. I'm not trying to annoy you. Just try to think of my introductory line as the bit you used to find at the beginning of a serialised TV show – back before boxset culture was so firmly established, and we didn't watch entire shows over the course of a marathon binge weekend. You know the part I'm talking about, where pertinent clips from old episodes were played and the narrator said "Previously on 24", or whatever the name of the show was. It's the catch-up that helped you pick up the story after a week's absence.

So, back to the matter in hand, previously on Torva Tenebris, I was talking about looking at cars and stuff.

As part of this I recently bought a couple of small kits from another of my favourite manufacturers, Antenociti's Workshop. It's a website full of great gear, and if you're into this kind of thing, and not yet familiar with them, then put aside an hour or so and go and get lost in their inventory.

The two vehicles I bought were the Nemesis Police Car and the Marrua Gaucho. Here's a shot of all the components, and the condition they turned up in.

Pretty darn good if you ask me

For the rest of this post I'll just quickly cover the few basic steps I went through to prepare the models for painting. I apologise (again) if this is all a little too kindergarten for you.

With resin kits, before you do anything else, you are always advised to give them a good scrub to clean off all the mould release agent.* I left mine in the sink (with water and washing-up liquid) to soak for about an hour first, then went at them with an old toothbrush.

Probably best not to use the brush on your teeth afterwards


After a little more soaking, I rinsed them several times and left them to dry. I then started work on the flash – the little bits of resin that creep through the gaps in the mould and aren't really supposed to be there. For big kits it's worth investing in a big file – this will really speed up the process.

Just to confirm I was not paid by B&Q for the placement of their product


The bodies of the cars hardly needed any work, but the wheels were slightly more involved. And I used a scalpel, rather than a file, to carefully remove any excess from those delicate looking bullbars. Once this was done, I brushed off all the resin powder, and realised it might have made more sense to file first, wash second.

Either way, the models were then ready for some glue. I wanted the wheels to stick out slightly further than my (freshly-filed) wheels were doing, so I stuck a small washer to the back of each wheel, before attaching them to the main bodies.


I didn't glue the bullbars to the Nemesis, as I thought they might interfere with the painting at a later stage, so have only attached them lightly for the benefit of the photo. I'l remove them again before I spray the undercoat.

There was one other stage I went through in prepping these cars. It wasn't relevant to the process, and it didn't work out so well – you might even say it was a complete disaster – so I won't go into it now, but will instead attempt to re-live the whole story in a later post.

It may take me a while to summon the courage.


*Do people wash plastic kits as well? I don't. Perhaps the injection moulding process doesn't require
 release agent? Or maybe I'm doing it all wrong?

Thursday, 8 September 2016

Miniature giants, part two: Spider drone

In my ongoing quest to fill the streets of Kru with all manner of weird and wonderful things, this next model is a giant robotic spider from Curtis Fell's Ramshackle Games. I love the original model so much I've done something with it that I rarely ever do.

Nothing.

Not only have I done absolutely no conversion work whatsoever, but I've also ripped off Ramshackle's original paint job. I used their work as the basis for my own, but tweaked the colours a bit and went on to incorporate some of the weathering I discussed in my last post.

I'm quite happy with the finished result, especially as it was a fairly quick process (compared to my normal sloth-like pace) – just a matter of hours (spaced over several days) from start to finish. If I could paint more like this, I'd be a very happy man. And one with far fewer unopened boxes lying around.

I imagine there could be a number of reasons why a strange, four-legged, robotic contraption might be found creeping through an Imperial hive city:

1) Perhaps it's simply some kind of drone, tasked on behalf of the municipal authorities to perform routine maintenance on the city's infrastructure.

2) Or maybe it's a servitor – similar to what I described in an earlier post as a hazard-zone sealed-servitor – a model for dangerous environments, with no organic parts left open to the elements.

3) Then again, what if it's a Mechanicus experiment that's escaped its testing ground, proving far more effective than they'd imagined, and not yet fully programmed to live peacefully alongside the other inhabitants of the city?

4) Or maybe that was the plan? It's some kind of awful Dark Mechanicus weapon that's recently clambered out from a heretical laboratory, hidden in the depths of the city, with murder and mayhem in its mind, sowing confusion before a larger invasion comes from the skies.


Whatever it is, I can see it fitting right in with the look of the city, maybe even providing a bit of inspiration for Inquisimunda style games: A hive gang has to stop it mapping their territory; or the Arbites have to hunt it down before it returns to its secret lair; or a member of an Inquisitorial strike team must make contact with it to download information about a terrible atrocity before it happens.

But it's not just about provoking fresh waves of thinking and inspiring new narrative. At their most basic level, one-off models like this will still add interesting and unusual texture to games – enriching the tabletop experience for not just players, but spectators too.


Tuesday, 23 August 2016

Staying on track

As is my way, I've decided to start a bunch of new modelling projects before the other fifty are finished. Over the next few months I've planned to make a selection of old, beaten-up vehicles for my Imperial hive city, Kruenta Karoliina Arx Rotunda.

Actually, 'plan' is too strong a word, as, on that front, I'm probably a lot more like Heath Ledger's Joker than Christian Bale's Batman.


"I'm a dog chasing cars. I wouldn't know what to do with one if I caught it!"


But with a little luck, in the coming weeks, some of those chased cars (and perhaps other vehicles, both wheeled and tracked) will be prepped, painted and posted here.


So with that in mind, it was pure luck that while visiting a friend last week, I happened to walk past a small enclosure full of rusty, old tractors.


I particularly like the way the first machine has oxidised heavily on its (now unused) tracks, but the rust gradually fades further up the vehicle, revealing the original paint job, before getting thicker again near the top. It looks to me like the rust is at its severest in places on the vehicle most exposed to, or most likely to trap, water. Also worth noting is how the (presumably heavily oiled) piston in the bottom picture has sustained no visible damage whatsoever, whilst the rest of the vehicle is completely battered.

Although I'm intending to vary the degrees of abuse I add to my vehicles, these pics are pretty close to the kind of thing I've got in mind.

Therefore if everything goes according to those plans I'm unable to make, look out for at least some of this deterioration appearing in my forthcoming projects.


Monday, 1 August 2016

Dredd. Judge, jury and executioner... But isn't there something missing?

In the established Judge Dredd comic mythos, the titular character and all his fellow Judges are part of the Mega-City One Justice Department. An all-encompassing government body that runs law enforcement, homeland security, foreign affairs, and pretty much anything of note pertaining to the future East Coast of North America.

International peacekeeper Dredd from Regime Change, with art by Eva De La Cruz

But the story wasn't originally conceived with such an expansive Justice Department.

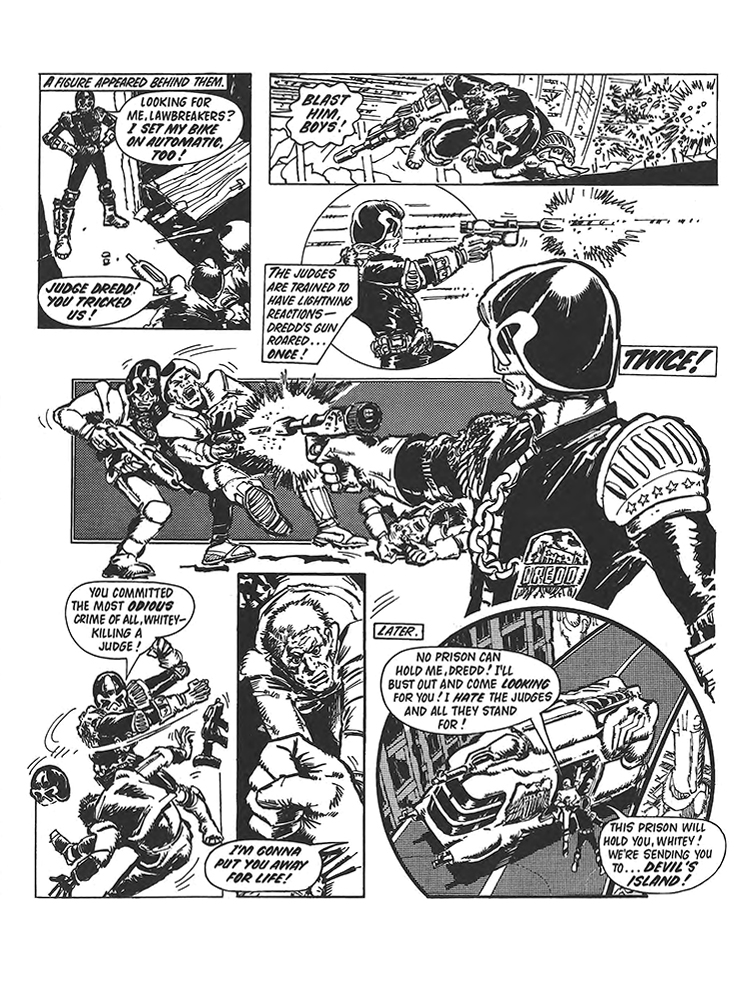
Back when the strip first launched it carried the tagline 'lawman of the future', yet for anyone who has more than a passing acquaintance with it, they will also have heard the phrase 'judge, jury and executioner' used in its context. I can't remember when this was said, or by who, and I've wholeheartedly failed to find any historic reference to it in reprints of the old comics, but I remember growing up in the 70s and 80s and it just kinda… pervading... the stories. I might be wrong, and after sifting through hundreds of pages of reprints looking for it, I'm certainly beginning to doubt myself now, but if there's one thing my childhood anti-hero has taught me, it's stubbornness and the misplaced belief that I am always right. Okay, that's two things, but the point is, I'm going ahead with this post anyway.

So now that I've firmly established that this phrase was part of early Dredd lore, let's look at it a little closer. Judge, jury and executioner. Those three roles, as intimidating as they sound, are all secondary to Dredd's real role. The job he does first and foremost, the one that puts him in constant physical danger, is that of policeman. He's out there looking for crimes to solve and prevent, just like a regular cop. When he's chasing someone down, being shot at, investigating clues and generally doing all that leg work, that's the cop part of his job. Only a tiny percentage of a case will be spent by him weighing up legal options, sentencing perpetrators and, if necessary, carrying out punishment.

This is especially true of the earlier stories

Yet (at least in my recollection) those other three roles were often used to define Dredd. Why is that? Could it be something to do with the original structure of the Justice Department?

It's a rarely discussed fact that in Dredd's early days there was a whole set of background characters that we no longer see. Characters that, when used as a backdrop for Dredd, gave his judicial powers all the more relevance. Back when the strip first launched, Dredd and the Judges weren't the only law in Mega-City One. There was still a regular police department at work in the city.

A Judge is targeted leaving a Police Department in an early story

Dredd was one of only a handful of elite cops with those extra powers of judge, jury and executioner. He and the other judges were called in when a situation became too much for the regular police to handle.

Commuter robots prove too tough for the police in an early Dredd epic

So perhaps 'cop' was left off that job description because he was surrounded by cops. Because being a police officer was the entry-level criteria for him and all his associates. It was the attributes of judge, jury and executioner that stood him apart, not just in the eyes of his readers, but also, crucially, in the eyes of the other characters in the story. Both citizens and police alike would see him as an elite specialist.

If the original set-up were as it is today, where all police work is done by Judges, then Dredd's early contemporaries wouldn't have been quite so in awe of him. There would have been less to stand him apart. He's just another Judge. Another member of the ubiquitous police force. Granted, he's particularly tough and resolute, but then he represents a system which relies on being tough and resolute. Whereas back at the beginning, by being a special cop among regular cops, everyone got the juxtaposition that highlighted Dredd's distinct credentials. His judicial status ranked him apart from his regular police contemporaries.

But the strip started to change fairly quickly. Instead of Police Department buildings we got Sector Houses, and it wasn't long before regular cops had simply disappeared altogether. The Justice Department grew and grew, eating up functionality, from pathology, to technological research, weapons development, military conquest and nearly all aspects of running a state (and its colonies) in the 22nd Century.

Colony Judges take a hit in The Corps, drawn by Paul Marshall & Donnie Cox
The role of the Judges expanded from being a kind of SWAT team on steroids, to the institution we see in stories today, more like an unelected, quasi-fascistic government. The original role of Judges, as a crack squad of beat cops with special powers, became a department, the Street Judges, within the greater organisation.

But they never lost their relevance.

You'd be forgiven for thinking that a system that encompasses nearly all governmental activities would routinely employ at least a few career politicians, but in Dredd's world this does not seem to be the case. The early veneration for the original frontline Judges has remained. Thus most (but not all) of the successful Chief Judges have cut their teeth through at least some work on the beat; cadets failing aspects of their training will probably be barred from the ranks of Street Judges but may still have opportunities to enlist in other departments; and being moved from the Street Judges to another department is often seen as a demotion.

Judge Castillo explains why she's no longer on the streets, with art by the iconic Carlos Ezquerra

So, although the Judges are now so much more than they were at the beginning, the role of a Street Judge - a cop combined with judge, jury and executioner - still has resonance today. Not just to us, the readers, but to the in-story characters as well.

That is, of course, provided judge, jury and executioner ever had resonance in the first place.